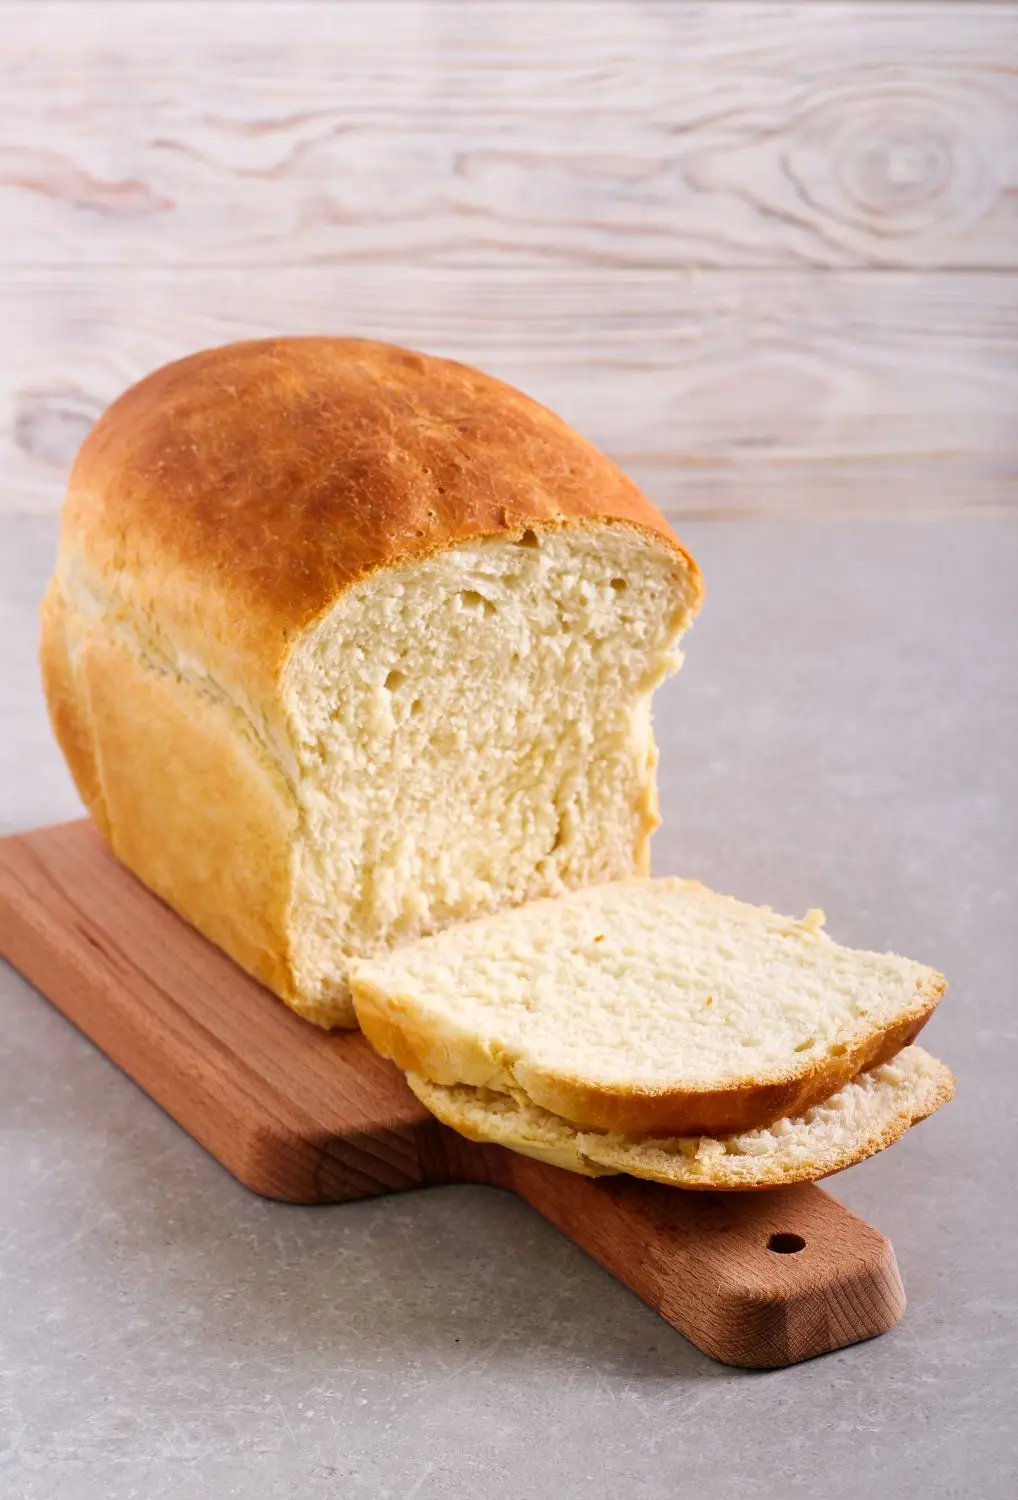
Soft, tall, and mildly sweet, this Amish white bread recipe produces a fluffy sandwich bread with a golden-brown top and a close-grained crumb that grocery store bread has never come close to matching. Amish cooks have relied on whole milk bread formulas like this one for generations, favoring simple ingredients and practical visual cues over equipment and guesswork.
If yeast doughs have intimidated you before, read on, because the method here is forgiving enough for a first-time bread baker and repeatable enough to become a genuine weekly habit.
Why This Amish White Bread Recipe Has Endured
Amish communities developed their baking traditions inside a culture that valued self-sufficiency, practicality, and consistency over novelty. Bread was a weekly necessity, not an occasional project, and the recipes Amish cooks relied on were built for that kind of repetition.
The baking techniques documented in published Amish cookbooks, including recipes catalogued in Mennonite and Old Order community collections that date as far back as the early 20th century, center on milk-enriched doughs because whole milk adds fat, protein, and natural sugars that commercial white flour alone cannot replicate.
The result of that tradition is what food historians sometimes call enriched white bread: a loaf built on whole milk, eggs, and a small amount of added sugar that feeds the yeast and deepens the crust color.
Whole milk fat tenderizes the crumb, the egg binds and adds structure, and the sugar produces that distinctive sweet flavor that sets Amish milk bread apart from standard homemade white bread. The formula has not changed because it does not need to.
Enriched, slightly sweet yeast doughs have deep roots across many baking traditions, and if the sweet flavor in this loaf appeals to you, the traditional conchas recipe follows the same principle with a completely different result on the table.
Four Visual Checkpoints That Replace the Timer
Amish bakers worked without electricity, without digital thermometers, and without stand mixers. What they had was repetition and sharp observation. The four checkpoints below are the same visual cues experienced bread bakers have relied on for generations, and they are more reliable than any timer because dough does not care what time it is. It responds to temperature, humidity, and yeast activity, all of which vary every single time you bake. Learn to read these four signals and you stop guessing your way through every loaf.
- The Foam Test
Combine your warm water, sugar, and yeast and leave it alone for 5 to 10 minutes. What you are looking for is a foamy, bubbly layer rising visibly across the surface of the liquid. That foam is carbon dioxide produced by active, living yeast. No foam means the yeast is dead, and no amount of kneading or rising time will fix that. Start over with a fresh package before you go any further. This single checkpoint saves you from wasting an afternoon on a loaf that was never going to rise. - The Doubled Volume Mark
Before the first rise, take a piece of tape and mark the outside of your bowl at the exact height of the dough. That mark is your baseline. The dough is ready when it visibly reaches twice that height, not when an hour has passed on the clock. A warm kitchen speeds the process. A cool one slows it down. The tape does not lie either way. - The Crown Height Rule
After shaping and during the second rise, the loaf is ready for the oven when the crown of the dough rises 1 to 1.5 inches above the rim of the pan. That height tells you the yeast is still active, the gluten structure is strong enough to hold the loaf upright in the oven, and the internal gas pressure is where it needs to be for good oven spring. A loaf that barely clears the rim goes into the oven underproofed. It will bake through, but the crumb will be denser and the height will disappoint you. - The Hollow Sound Tap
Pull the loaf from the pan and turn it upside down. Tap the bottom firmly with your knuckles. A hollow, drum-like sound tells you that the interior moisture has evaporated properly and the crumb structure has fully set. A dull, heavy thud means the interior is still wet and needs more time. Pair this test with an internal temperature of 190 to 195°F on an instant-read thermometer and you have two independent confirmations that the loaf is done. Use both until tapping alone feels reliable enough to stand on its own.

Amish White Bread Recipe
Rooted in Amish baking traditions that date back to early 20th-century Mennonite community cookbooks, this Amish white bread recipe uses whole milk, egg, and a small measure of sugar to build an enriched dough that bakes into a soft, tall, golden-brown loaf with a mildly sweet flavor. Unlike lean grocery store bread, the whole milk fat tenderizes the crumb and extends the shelf life naturally, while the egg adds structure that holds up through slicing, toasting, and even thick-cut French toast. The method relies on visual checkpoints, the windowpane test, the foam test, and the crown height above the pan, so you are never guessing.
- Total Time: 3 Hours
- Yield: 1 Loaf 1x
Ingredients
- 1 cup whole milk, room temperature
- 3 tablespoons granulated sugar
- 1 package dry yeast (active dry yeast or instant yeast)
- 1/4 cup warm water
- 1 egg, room temperature
- 2 tablespoons vegetable oil OR 2 tablespoons melted butter
- 1 teaspoon salt
- 3 1/2 cups bread flour, plus up to 1/3 cup additional for kneading
Instructions
- Step 1: Activate the yeast
Combine the warm water, sugar, and yeast in a large measuring cup. Stir gently and let the mixture sit undisturbed for 5 to 10 minutes. You are looking for a foamy, bubbly layer that rises across the surface. That foam is your confirmation the yeast is alive and active. If nothing happens after 10 minutes, your yeast is not viable. Start with a new package before going further. While the yeast activates, crack your egg into a small bowl or glass and beat it fully until the yolk and white are completely combined. - Step 2: Combine the dry ingredients
In the large bowl of a stand mixer (or a large bowl if mixing by hand), combine the bread flour and salt. Mix them together thoroughly so the salt is evenly distributed before the wet ingredients go in. Salt and yeast should never make direct contact before mixing; if the salt hits the yeast mixture before it is buffered by flour, it can inhibit yeast activity. - Step 3: Build the dough
Create a well in the center of the flour. Add the beaten egg, oil or melted butter, and the full yeast mixture into that well. Mix on low speed using the dough hook attachment until the ingredients start to come together and the sides of the bowl are mostly clean, about 2 to 3 minutes. Increase to medium speed and knead for 8 to 10 minutes total, until the dough is smooth, elastic, and pulls cleanly from the bowl. Stop and do the windowpane test: stretch a small piece of dough between your fingers. If you can see light through it without it tearing, the gluten is developed and the dough is ready. If it tears, keep kneading in 2-minute increments and test again. - Step 4: First rise
Drizzle about a teaspoon of oil over the dough in the bowl and turn the dough once so it is lightly coated on all sides. This prevents a dry crust from forming on the surface. Set your oven to its lowest setting for one minute, then turn it off. Place a glass measuring cup filled with boiling hot water in the bottom of the oven. Put the bowl in and close the door. Let the dough rise for about 1 hour, or until it has doubled in size. Doubled means visibly twice the original volume, not just puffed. At this point, the hardest part of the recipe is already behind you. - Step 5: Shape the loaf
Turn the risen dough out onto a clean, lightly floured surface. Punch it down firmly with the heel of your hand to release the air bubbles, then knead for 2 to 3 minutes, adding flour in small amounts only as needed to keep it from sticking. Stop when the dough is smooth and stretchy. Use your fingers and palms to flatten it into a rectangle roughly the width of your prepared loaf pan. Roll the dough tightly into a cylinder, pressing out any air pockets as you go. Pinch the final seam firmly along its full length to close it, and place the loaf seam-side down into the greased and parchment-lined loaf pan. - Step 6: Second rise
Return the pan to the warm oven with a fresh measuring cup of boiling hot water. Leave the loaf uncovered and let it rise for 45 to 60 minutes. Do not rush this stage. The dough is ready when the crown rises 1 to 1.5 inches above the top of the pan. That height tells you the yeast is fully active and the loaf will have good structure in the oven. If the crown is barely clearing the rim, give it more time. - Step 7: Preheat and bake
About 5 to 10 minutes before the second rise looks complete, remove the pan from the oven and preheat to 375°F. Place the loaf pan directly on the center rack in the middle of the oven. Bake for 30 to 40 minutes, until the top crust is deep golden brown, the bottom of the loaf sounds hollow when tapped, or an instant-read thermometer inserted into the center reads 190 to 195°F. If the top starts to darken faster than expected, loosely tent it with aluminum foil during the final 10 minutes. - Step 8: Cool the loaf
Remove the pan from the oven and let the bread cool in the pan for 5 minutes. Then turn the loaf out onto a wire cooling rack. For a softer top crust, brush the surface with melted butter while the loaf is still hot. Allow the loaf to cool completely to room temperature before slicing. Cutting into a hot loaf collapses the crumb and compresses the interior texture you worked to build. Thirty minutes of patience makes a real difference in the final slice.
- Prep Time: 20 Minutes
- Rise Time: 2 Hours
- Cook Time: 40 Minutes
- Category: Bread
- Method: Baking
- Cuisine: American
Pin This Amish White Bread Recipe For Later
What Amish Bakers Built Into This White Bread Recipe
Every element in this formula is doing a specific job. Understanding why each ingredient matters helps you troubleshoot on the fly instead of guessing.
Whole Milk Instead of Water
Whole milk is the reason this loaf has a softer crumb and longer shelf life than a standard water-based homemade bread recipe. The fat coats the gluten strands and keeps them tender, while the milk proteins help the crust brown evenly.
Skim milk can work in a pinch, but it will not produce the same depth of softness. Use whole milk and bring it to room temperature before you start.
Sugar as Yeast Fuel, Not Just Sweetness
Three tablespoons of sugar in a single loaf is a deliberate ratio. The sugar feeds the yeast mixture during activation and in the first rise, speeds up fermentation, and contributes to the golden-brown crust color through caramelization.
Cut the sugar and you get a paler loaf with a slower rise. This is a sweet loaf by design, and that sweet flavor is part of the appeal.
Vegetable Oil Versus Melted Butter
Both options produce a good loaf, but they behave differently in the crumb.
Vegetable oil keeps the texture tender and uniform, makes the dough easier to handle, and is a reliable choice if you want a soft, pillowy sandwich bread with a consistent crumb from edge to edge.
Melted butter adds a richer flavor and produces a slightly firmer, more golden crumb that holds up particularly well when toasted.
If you are making this loaf for everyday sandwiches or French toast, vegetable oil is the practical call. If you want a little more depth of flavor in every slice, go with melted butter.
Why This Recipe Uses Bread Flour
Bread flour has a higher protein content than all-purpose flour, typically around 12 to 13 percent compared to all-purpose at 10 to 11 percent, and that difference matters in a loaf like this one. More protein means more gluten development, which gives the dough better structure, more height, and a crumb that holds its shape cleanly when sliced.
For a sandwich loaf that needs to stand up to toppings, toasting, and thick-cut French toast slices, bread flour is the correct choice. All-purpose flour will work, but expect a slightly shorter, softer loaf with a more tender crumb.
The Windowpane Test Is Important
Kneading develops the gluten network that gives your loaf structure. When the dough is properly developed, you can stretch a small piece thin enough to see light through it without it tearing. That is the windowpane test, and it tells you more than the clock does.
Eight to ten minutes in the bowl of a stand mixer with the dough hook attachment is usually enough. If you are kneading by hand on a lightly floured surface, plan for a bit longer. Stop when the dough is smooth, stretchy, and passes the test.
Gluten Development Stages & Dough Behavior
Kneading Time | Dough Behavior | Windowpane Result |
|---|---|---|
0-3 minutes | Shaggy, rough texture | Tears immediately when stretched |
4-6 minutes | Starting to smooth out | Stretches slightly, then tears |
7-9 minutes | Smooth, elastic, pulls from bowl | Stretches thin, small tears at edges |
10+ minutes |
Silky, strong, springs back |
Stretches translucent without tearing |
15+ minutes |
Over-kneaded, tight, resistant |
Becomes stiff, loses workability |
How to Make Perfect Amish White Bread
Get Your Yeast Right Before You Do Anything Else
The biggest reason homemade yeast breads fail is yeast that is dead or was never activated properly in the first place. Start by combining the warm water (between 100°F and 110°F), sugar, and yeast in a large measuring cup. Stir gently and wait. In 5 to 10 minutes, you should see a foamy layer forming on the surface.
If nothing happens, your yeast is not viable. Use new yeast before going further. This step costs you nothing except a few minutes, and it prevents you from wasting an afternoon on a loaf that will not rise.
Room Temperature Ingredients Matter More Than You Think
Cold milk or a cold egg out of the refrigerator slows down yeast activity and can cause uneven gluten development.
Both your whole milk and your egg should be at room temperature before they go into the dough. If you forgot to pull them out ahead of time, set the egg in a bowl of warm water for five minutes and warm the milk briefly in a small bowl in the microwave until it is no longer cold to the touch.
Build a Warm Spot for Both Rises
Amish cooks did not have modern ovens with proof settings, but they understood that bread dough rise time depends entirely on ambient temperature. Too cold and the dough barely moves. Too hot and you risk killing the yeast.
The method in this recipe uses a warm oven with a measuring cup of boiling hot water placed inside, which creates a humid, controlled environment that is ideal for proofing. Set the oven to its lowest setting, then turn it off before placing the dough inside. This warm place is more reliable than a warm spot on the counter and more consistent than any other method I have tested.
Do Not Add Too Much Flour During the Second Knead
After the first rise, you will punch down the dough and knead it briefly on a lightly floured surface. At this point, the dough will feel slightly tacky and that is correct.
Add flour only as needed to prevent it from sticking to your hands or the counter, and add it gradually, up to 1/3 cup total. Too much flour produces a tight, dry loaf with a dense crumb. Stop adding flour the moment the dough handles cleanly.
The Second Rise Is Where Height Comes From
Do not shortcut the second rise. The loaf is ready to go into the oven when the crown of the dough rises 1 to 1.5 inches above the rim of the pan. That visual indicator is more reliable than a timer because room temperature, yeast activity, and dough hydration all vary. If the dough barely clears the top of the pan, give it more time. Bread that goes into the oven underproofed will have a dense interior and may not rise evenly.
Watch the Top Crust, Not Just the Clock
Bake at 375°F for 30 to 40 minutes, but start checking at 30 minutes. The top crust should be deep golden, and the loaf should produce a hollow sound when you tap the bottom. If you have an instant-read thermometer, the internal temperature should reach 190 to 195°F. If the top is browning faster than the interior is cooking, tent it loosely with aluminum foil for the final 10 minutes. Remove the loaf from the pan after five minutes of cooling in the pan, then transfer it to a wire cooling rack. Wait until it is completely cool before slicing or the interior crumb will not have set and you will compress the loaf every time the knife goes through.
Recipe Variations, Serving Ideas, & Storage
Recipe Variations
Tools & Ingredients Worth Having for This Amish White Bread Recipe


Frequently Asked Questions
Yes, and it is a direct swap at the same measurement. Instant yeast does not require the foam test to activate, but doing the test anyway costs nothing and confirms the yeast is viable before you invest time in the rise.
If you use instant yeast, your dough may rise slightly faster during both the first rise and the second rise, so check it at 45 minutes rather than waiting the full hour.
Bread dough that does not rise usually points to one of three things: yeast that was dead before it went in, water that was too hot and killed the yeast during activation, or a proofing environment that was too cold.
Water for activating yeast should stay between 100°F and 110°F. Above 115°F, the yeast starts to die. If your warm water was too hot, start over with new yeast and cooler water. If the environment was too cold, move the bowl to a genuinely warm spot or use the warm oven with boiling water method described in the instructions.
Yes, absolutely. Combine all the ingredients in a large bowl, stir with a wooden spoon or a dough whisk until a shaggy dough forms, then turn it out onto a lightly floured surface and knead by hand for 10 to 12 minutes.
Hand kneading takes a few minutes longer than the dough hook attachment, but the result is the same as long as you reach the windowpane test.
Three reliable indicators work together: the top crust is deep golden brown, the bottom of the loaf produces a hollow sound when tapped, and an instant-read thermometer inserted into the center of the loaf reads 190 to 195°F.
If the top is golden but the interior temperature has not reached at least 190°F, give it 5 more minutes and check again. A loaf pulled from the oven early will have a gummy interior that does not slice cleanly even after cooling.
A dense or gummy interior usually means the loaf was underbaked, sliced while still hot, or the second rise was cut short.
Let the bread reach an internal temperature of 190 to 195°F before pulling it out of the oven, and allow it to cool completely on a wire cooling rack before the first slice.
Slicing a hot loaf compresses the interior crumb and makes it look and feel dense even if the structure was correct.
Stored in an airtight container at room temperature, this loaf stays fresh for 2 to 3 days. For longer shelf life, slice the fully cooled loaf, separate slices with small squares of parchment, and freeze in a sealed bag for up to 2 months.
Do not refrigerate the bread; refrigeration accelerates staling and draws moisture out of the crumb faster than room temperature storage does.
Yes. After the first rise, punch the dough down, place it in a clean bowl or airtight container, cover it tightly, and refrigerate it overnight.
The next day, pull the dough out and allow it to rest at room temperature for 30 to 45 minutes before shaping. Cold fermentation overnight often produces a slightly more developed flavor than same-day baking.
The windowpane test is a simple gluten development check. Take a small piece of dough and stretch it slowly between your fingers. Properly kneaded dough will stretch thin enough that you can see light through it without it tearing.
If it tears immediately, the gluten has not developed enough and the loaf will have poor structure and a coarse crumb. Continue kneading in 2-minute intervals and test again.
Once you know what properly developed dough feels like, you will carry that knowledge into every yeast bread recipe you make.
Yes. Add the ingredients in the order your bread machine manual specifies, typically wet ingredients first, then dry ingredients, then yeast on top. Select the basic or white bread cycle.
The recipe adapts well to a standard bread machine, though the crust will be slightly different from oven-baked, and you will not get the same height from the crown.
The Second Loaf Is Always Better Than the First
Once you have made this amish white bread recipe two or three times, the process becomes predictable in the best way. You stop second-guessing the dough and start reading it. You stop checking the clock and start checking the loaf.
That shift from following instructions to understanding technique is the real takeaway from a recipe like this one. Amish cooks built this formula for repetition, reliability, and results. Make and eat bread that actually tastes like something and you will not miss the grocery store aisle.
If this is your first time baking a yeast bread from scratch, browse the full collection of yeast bread recipes on Recipe Rewind and keep building from here.
Did you grow up with homemade white bread in the house? Leave a rating and tell me about it in the comments.

0 comments