Homemade pierogies shouldn't feel intimidating! This easy homemade pierogi recipe is built to succeed on your very first try. Traditional Polish pierogis took root in a simple flour-based dough and whatever filling was affordable and available, from farmer's cheese to sauerkraut to plain potato.
The cheesy potato version most of us grew up eating is a Polish-American adaptation. Leftover mashed potatoes from last night's dinner are perfectly at home here, which makes this one of the most satisfying ways to give yesterday's side dish a whole new life.
Making pierogies from scratch is the kind of kitchen project that feels ambitious until you're halfway through, and then you realize you've got this completely handled.
The Dough Fear Is Real, So Let's Address It
If you've ever backed away from homemade pierogies because of the dough, you're not alone.
For most of my cooking life, dough was the thing I handed off to Sully and walked away from. It's only in the past few years that I've built real confidence working with it, and I'll tell you: the practice is worth every minute. The payoff of putting a broader, more satisfying meal on the table for your family is a feeling that genuinely doesn't get old.
There's no rise time, no proofing, no crossing your fingers while you wait to see if the yeast did anything. You mix the dough, give it a short rest, and roll it out. Pierogi dough is genuinely one of the most cooperative doughs you'll ever work with.
Back in the Iron Curtain Kitchen
Pierogi have been a staple across Eastern European countries for centuries, and Polish cooking in particular has long treated them as everyday food rather than special occasions fare.
By the mid-20th century, as families in Poland, Ukraine, and Slovakia navigated postwar food shortages and rationing, pierogis became a household anchor: inexpensive to make, adaptable to whatever filling was available, and filling enough to function as a complete main course.
Mashed potatoes and cheese were a Western adaptation that took hold in Polish-American communities (like my home state of Wisconsin) throughout the 1950s and 60s, as immigrant families adjusted traditional recipes using ingredients they could actually find at the local grocery store.
Back in those kitchens, nobody was using a stand mixer or a dough hook. A large bowl, a flat surface, and about 5 minutes of kneading was all it took. Polish pierogies made their way from community church halls to potluck suppers to Tuesday night dinners, and somehow they never stopped being the thing everyone asked about at the table.
Does a dish like this ring any bells for you? Even if you didn't grow up eating them, the first time you bite through that golden brown pan-fried exterior into a cheesy potato filling, it'll feel like you've been missing them your whole life.
If you're in the Milwaukee area, don't miss Polish Fest!
Celebrating Polish arts, culture, and traditions -
sharing the gift of heritage with future generations!
What Makes This Such An Easy Homemade Pierogi Recipe
The Dough Is Built for Beginners
Perfect pierogi dough doesn't require fancy technique. The combination of all-purpose flour, egg, vegetable oil, and warm water creates a tender dough that's pliable enough to roll thin and strong enough to hold a full tablespoon of filling without tearing. Letting the dough rest at room temperature for 30 minutes to an hour is the step that does most of the work for you: the gluten relaxes, the dough becomes softer and easier to roll, and you end up with a smooth, workable surface instead of a springy, resistant one. You do NOT want to skip that rest period.
The Cheesy Potato Filling Is the Real Star
A simple filling is not a boring filling. Mashed potatoes become something entirely different when you fold in sauteed onion, butter, and two full cups of shredded cheddar cheese. The fat from the cheese and butter creates a cheesy potato filling that stays creamy inside the pierogi even after boiling and pan-frying. If you happen to have leftover mashed potatoes in the fridge, they're ideal here — cold mashed potatoes actually hold their shape better as you roll the filling into balls, which makes the whole assembly process faster and cleaner.
The Two-Step Cook Method Is the Secret
Boiling followed by pan-frying might sound like extra work, but it's what separates a truly great pierogi from a gummy, pale one. Boiling in a large pot of salted water cooks the dough all the way through. The hot skillet with butter finishes the job, creating that golden brown, slightly crisp exterior that gives way to soft dough and a warm, cheesy center. Skipping the boil step and going straight to the frying pan will leave you with a raw interior, no matter how long you cook them.
Easy Homemade Pierogi Recipe
Pierogis are a traditional unleavened dough dumpling rooted in Polish cooking and popular throughout Eastern European countries for centuries. This easy homemade pierogi recipe uses a soft, egg-enriched dough wrapped around a cheesy potato filling made from mashed potatoes, cheddar cheese, and caramelized onion. After boiling in salted water, each pierogi is pan-fried in butter until golden brown on both sides, producing a crisp exterior with a creamy, savory center. The dough rests for up to one hour before rolling, which is the step that keeps it pliable and easy to seal.
- Total Time: 1 Hour 30 Minutes
- Yield: 32 Pierogies 1x
Ingredients
For The Dough
- 3 cups all-purpose flour, plus a bit of flour for dusting your work surface
- 1 large egg, beaten
- 3 tablespoons vegetable oil
- 1 teaspoon salt
- 1 cup water, warm (plus more as needed)
For The Filling
- 1.5 pounds mashed potatoes
- 1 medium white onion, finely diced
- 2 tablespoons butter
- 2 cups shredded cheddar cheese
- Salt and black pepper to taste
For Cooking
- 3 tablespoons butter
- Large pot of salted water
For Serving
- 1 onion, diced or thinly sliced
- Sour cream
Instructions
Step 1: Mix and rest your dough
- In a large bowl, combine the all-purpose flour, beaten egg, vegetable oil, salt, and 1 cup of warm water.
- Mix everything together until a shaggy dough forms, then bring it together with your hands. If the dough feels stiff and won’t come together, add water a tablespoon at a time until it hydrates. You’re looking for a soft, slightly tacky dough, not a sticky one.
- Turn the dough out onto a lightly floured surface and knead for 4 to 5 minutes, working it until the surface becomes smooth and pliable and springs back gently when you poke it.
- Wrap the dough tightly in plastic wrap and let it rest at room temperature for at least 30 minutes and up to 1 hour. This rest period is non-negotiable: the gluten needs to relax before you roll it, or the dough will keep snapping back and fighting you the whole time.
Step 2: Make the filling
- In a medium skillet over medium-low heat, melt 2 tablespoons of butter and add the finely diced white onion.
- Cook slowly, stirring occasionally, until it turns soft and translucent without picking up any brown color, about 8 to 10 minutes. The goal here is tender and sweet, not caramelized.
- Transfer the cooked onion to a large bowl with your mashed potatoes. Add the shredded cheddar cheese and the remaining butter, then stir the whole mixture together until the cheese melts fully and the potatoes become very smooth and uniform.
- Taste the filling and season generously with salt and black pepper. A bland filling means a bland pierogi, so don’t be shy here.
Step 3: Set up your assembly station
- Line two baking sheets with parchment paper before you start rolling. Once you’re in the rhythm of cutting and filling, you’ll want a clean surface to place finished pierogies without them touching each other.
- Divide the dough in half and keep the rest of the dough covered in plastic wrap so it doesn’t dry out while you work the first half.
Step 4: Roll and cut the dough
- On a lightly floured surface, roll out the first half of your dough to about one-eighth of an inch thick. It should feel smooth and cooperative after its rest.
- Use your 3-inch round cookie cutter to cut circles from the dough as efficiently as possible.
- Gather the scraps, press them together, and let them rest for a few minutes before re-rolling to cut more circles. You’ll get a couple of extra rounds from each batch of scraps, so don’t toss them.
Step 5: Fill and seal
- Scoop about one tablespoon of the filling and roll it into a smooth ball between your palms. Place the ball in the center of a dough circle.
- Fold the dough over the filling to form a semi-circle, pressing out any air pockets as you press the edges together firmly with your fingers.
- Crimp the entire edge with the tines of a fork to create a secure seal. Press firmly enough to create a visible impression but not so hard that you cut through the dough.
- Place each finished pierogi in a single layer on your lined baking sheet.
- Continue with the remaining filling and the rest of the dough, keeping finished pierogies covered with a clean kitchen towel to prevent drying out.
Step 6: Boil the pierogies
- Bring a large pot of generously salted water to a rolling boil.
- Working in batches, gently lower the pierogies into the boiling water without crowding them. They need room to move so they don’t stick together.
- Cook until they float to the surface, about 2 to 4 minutes per batch.
- Once they float, give them an additional 30 seconds to ensure the dough is fully cooked through, then remove them with a slotted spoon and transfer to a plate. They’ll look pillowy and slightly translucent at this stage. That’s exactly right.
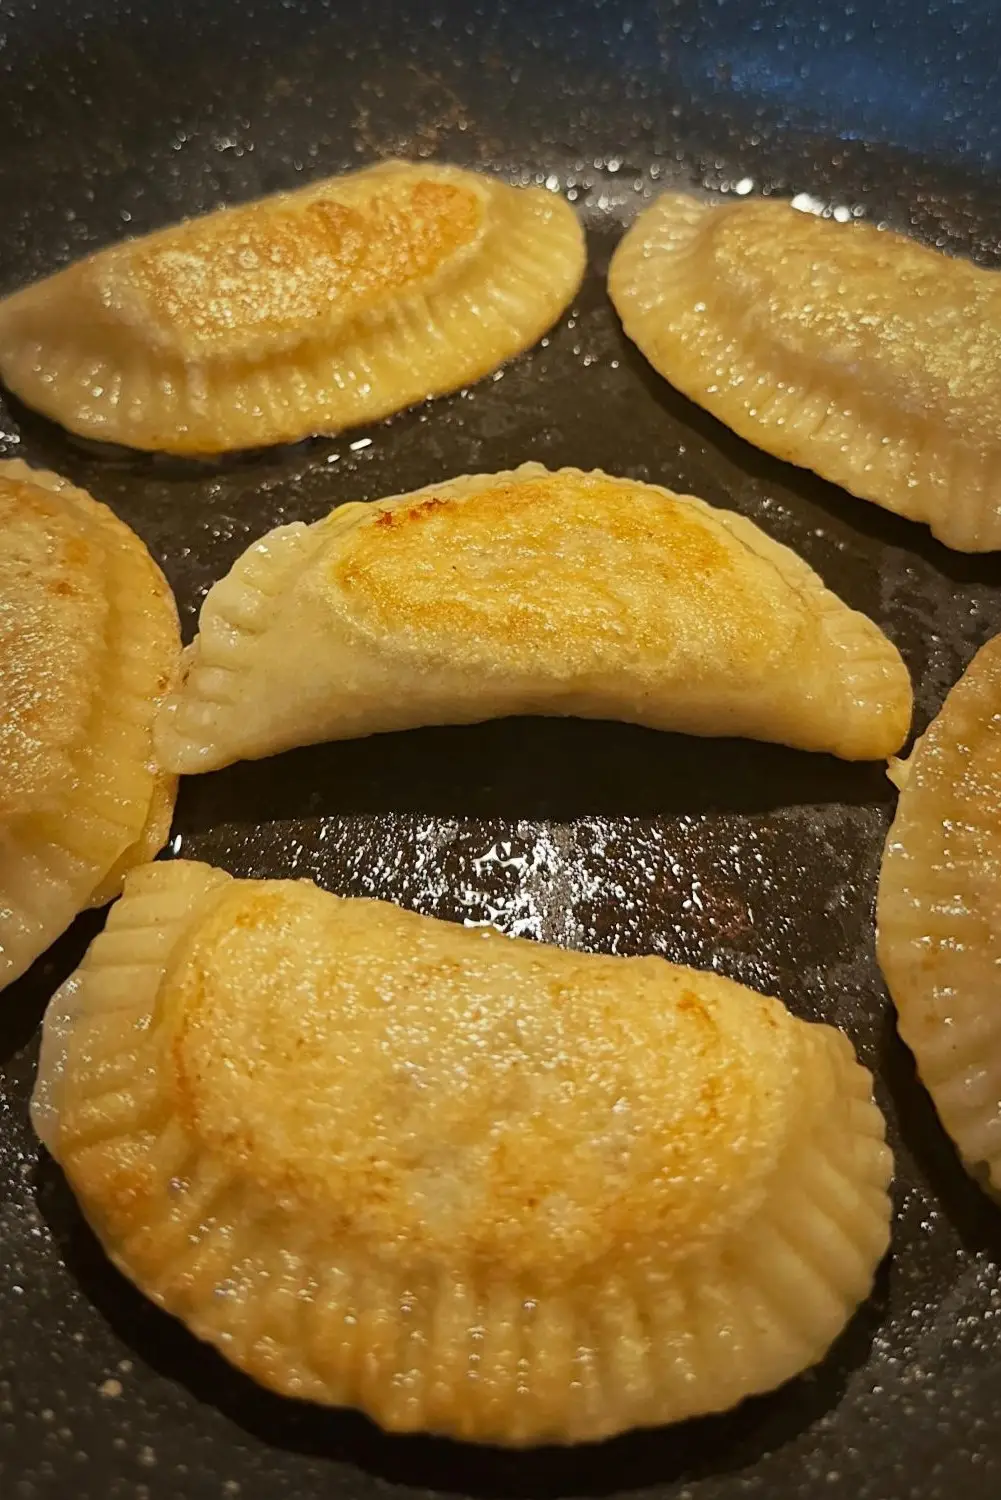
Step 7: Pan-fry to golden brown
- In a large skillet over medium heat, melt 3 tablespoons of butter until it foams.
- Add your boiled pierogies in a single layer and cook for about 2 to 3 minutes per side, until each one develops a golden brown, slightly crisp surface.
- Work in batches if needed, adding more butter between rounds.
- While the last batch of pierogies finishes, add your second diced or sliced onion to the same pan with a little extra butter if needed.
- Cook over medium-low heat until soft and golden, about 8 to 10 minutes. These serving onions are worth every extra minute on the stove.
- Serve the pierogies warm, topped with those onions and a cold dollop of sour cream on the side.
- Prep Time: 1 Hour
- Cook Time: 30 Minutes
- Category: Appetizer, Dinner, Lunch
- Method: Boiling, Frying
- Cuisine: Polish
How to Make Perfect Homemade Pierogies
Measure Your Dough Thickness
Rolling the dough to one-eighth of an inch (or even a bit less than one-eighth) is the single most important thing you can do for consistent results. Dough that's too thick cooks unevenly and tastes dense; dough that's too thin tears when you fold it over the filling.
If you're eyeballing it, use the edge of a butter knife as a rough guide. A rolling pin with adjustable thickness rings takes the guesswork out completely, and if you make pierogies more than once a year, that tool earns its drawer space fast.
Struggling with dough that bounces back when you roll it is almost always a sign that you need to let it rest a few more minutes before continuing. The gluten is still tense, and no amount of extra pressure from the rolling pin is going to change that. Cover the dough, give it 10 minutes, and try again. You'll feel the difference right away.
A rolling pin with adjustable thickness rings 🛒 distributes even pressure across the dough, which means you won't end up with thin edges and a thick center that seals unevenly.
Use the Right Cutter
A 3-inch round cookie cutter or biscuit cutter cuts clean circles without stretching the dough. Improvising with a drinking glass works in a pinch, but the rim of most glasses isn't sharp enough to cut through the dough cleanly, which means you end up tugging at it and thinning out the edges.
A 3" round biscuit cutter 🛒 keeps your circles consistent and your edges clean, so every pierogi seals properly and cooks evenly.
Don't Overfill
One tablespoon of filling per pierogi is the number. More than that and the edges won't seal, which means filling escapes into your boiling water and you end up with potato soup nobody asked for.
Roll the filling into a smooth ball before placing it on the cut dough. That shape helps you fold the dough over cleanly and gives you even coverage from edge to center.
Seal Like You Mean It
Fold the dough into a semi-circle and press the edges firmly together with your fingers first, pushing out any trapped air as you go. Then crimp the edges with a fork for a mechanical seal that won't open in the boiling water. A fork with wider tines creates a deeper crimp and a stronger seal than a thin one. If an edge looks even a little bit questionable, press it again. Pierogies that open in the pot are a specific kind of disappointment.
Work in Batches
Trying to boil a full batch of raw pierogies in one pot crowds them together and causes them to stick. Add them in a single layer to your large pot of salted water and give them room to move.
They're done when they float, which takes about 2 to 4 minutes. Use a spider strainer or slotted spoon 🛒 to lift them out cleanly without tearing the dough, and transfer them directly to your hot skillet to finish.
Recipe Rewind is an Amazon Associate and earns from qualifying purchases made through our affiliate links. We only recommend kitchen tools and products that coordinate with our vintage recipes and traditional cooking methods. Your purchases help us keep culinary traditions alive.
Easy Homemade Pierogi Recipe Variations, Serving, & Storage
Recipe Variations
Frequently Asked Questions
Yep. Pierogi dough can be made up to 24 hours in advance and stored in the refrigerator, tightly wrapped in plastic wrap.
When you're ready to use it, let the dough come back to room temperature for about 20 minutes before rolling so it becomes soft and pliable again. Cold dough straight from the fridge is much harder to roll thin and tends to tear at the edges.
I use a two-step process: press the edges firmly with your fingers first to push out any trapped air, then crimp with a fork to create a mechanical seal. Air pockets inside the sealed edge are the main reason pierogies pop open during boiling.
If you're having trouble getting a good seal, try dampening the edge of the dough circle with a tiny bit of cold water before folding it over. That small amount of moisture acts like a glue and strengthens the bond.
Yes! Boiling the pierogies in a large pot of salted water before transferring them to the hot skillet is essential for fully cooking the unleavened dough all the way through.
Skipping straight to the frying pan will give you a nicely browned exterior with raw or gummy dough inside, regardless of how long you cook them. The boil cooks the dough; the fry creates the texture. Both steps matter.
Pierogi dough can be made using the dough hook attachment on a stand mixer, which reduces the hand-kneading time to about 3 minutes.
Combine all the dough ingredients in the bowl of a stand mixer, attach the dough hook, and mix on medium speed until the dough forms a smooth, elastic ball. Whether you use the bowl of a stand mixer or a large bowl and your hands, the dough still needs its full rest period before rolling.
Russet potatoes produce the smoothest, driest mashed potatoes, which makes them the best choice for a cheesy potato filling that holds together inside the pierogi without being watery.
Waxy potatoes like red or yellow varieties hold more moisture, which can make the filling soft enough to squeeze out when you seal the edges.
If you're starting from scratch rather than using leftover mashed potatoes, cook your russets until very tender, drain them well, and mash them while still warm before adding the cheese and butter.
I wouldn't. Baking pierogies after boiling is possible, but the result is noticeably different. Baked pierogies have a firmer, chewier exterior rather than the crisp, buttery surface you get from a hot skillet.
If you want to avoid standing at the stove for the fry step, brush boiled pierogies with melted butter, arrange them on a parchment-lined baking sheet, and bake at 400 degrees for about 15 to 20 minutes, flipping once halfway through. No guarantees with this method. It's just not the same.
Homemade pierogies are done boiling when they float to the surface of the water, which takes about 2 to 4 minutes. Once they float, give them an additional 30 seconds before removing them with a slotted spoon.
Floating tells you the dough is cooked and the filling is heated through. If one or two pierogies don't float within 5 minutes, they likely have a small air pocket inside; remove them anyway and check the seal on your remaining unbaked ones.
Butter produces better flavor and a more golden brown surface than olive oil for pan-frying pierogies. The milk solids in butter brown at higher heat and create that characteristic nutty, slightly caramelized exterior that olive oil can't replicate.
If you need a dairy-free option, a neutral oil like avocado oil over medium heat produces decent browning, though the flavor profile changes. For best results, stick with the tablespoons of butter called for in the original recipe.
This really is subjective. When I make the recipe, it creates about 32 pierogies, so 4 per serving ... but my limit is 3. I find they are very filling.
Lorem ipsum dolor sit amet, consectetur adipisicing elit, sed do eiusmod tempor incididunt ut labore et nam dolore magna aliqua. Ut enim ad minim veniam, quis nostrud exercitation ullamco nam laboris nisi ut aliquip ex ea commodo consequat. Duis aute irure dolor in reprehenderit in adec voluptate velit esse cillum dolore eu fugiat nulla pariatur.
Pin This Chocolate Cake With Black Cocoa Recipe For Later
Go Make Somebody's Favorite Meal
Homemade pierogies have a way of becoming the dish people text you about long after the meal is over, casually asking when you're making them again. They're the kind of food that earns a permanent spot in your rotation, not because they're complicated, but because they're exactly right every time.
If you make this easy homemade pierogi recipe, please leave a rating and review! I'd love to know what filling you used, whether you went the classic cheesy potato route or tried something new. And if pierogies were a regular part of your family table growing up, tell me about it in the comments.

0 comments