Anyone can pop open a tube of refrigerated dough and call it a morning. That is a perfectly functional choice, and nobody is judging it. But you are not here for functional. You are here because you understand that real pecan sticky buns, the kind built on a properly risen yeast dough with a brown sugar caramel pecan sauce baked into the bottom of the pan, is a fundamentally different thing than what comes out of a cardboard tube.
The from-scratch process is not harder. It is just longer, and that length is what makes them so good. The warm milk and active dry yeast build a fluffy dough with actual structure and depth. The first rise develops flavor the refrigerated version never gets the chance to produce. The gooey caramel base thickens and darkens in the oven, absorbing the toasted pecan pieces and becoming something a pre-made product simply cannot manufacture.
You already knew that before you clicked on this recipe. That is exactly why you are here.
The kind of breakfast that makes people linger at the table does not stop here. Find more ideas in the vintage breakfast recipes collection.
The Kind of Baking That Stays With You
Sticky buns have been showing up on American breakfast tables since at least the early 1800s, when Pennsylvania German bakers brought their tradition of schnecken, a yeasted, rolled pastry topped with nuts and syrup, into home kitchens that had no mixers, no instant yeast, and no grocery store two miles away. Those bakers were not making schnecken because it was easy. They were making it because the people sitting at their table were worth the effort.
That is still the reason. Nobody spends two and a half hours on a Saturday morning making pecan sticky buns from scratch because they had nothing else to do. They do it because there is something that happens when a pan of homemade sticky buns hits the table that a store-bought product cannot replicate, and the people in your house know the difference even if they never say so out loud. The smell alone covers the whole house before anyone is fully awake.
I make these because my family asks for them by name. That is the only review that matters. The caramel pecan topping, the soft pull-apart layers, the cinnamon baked into every spiral, those details exist because someone at the table is worth getting them right.
Learn this recipe well enough and it becomes the one your own family asks for by name too.
What Makes This Pecan Sticky Buns Recipe Work
Active Dry Yeast Needs a Real Start
The 10-minute rest for the yeast mixture is your first quality check, not a step you can skip to save time. Active dry yeast has a protective coating that needs to dissolve in warm liquid before the yeast becomes fully active.
Warm milk contributes both the right temperature range and a small amount of sugar that feeds the yeast during proofing. What you are watching for is a visibly frothy, foamy surface, which tells you the yeast is alive, active, and ready to leaven your dough properly.
Brown Sugar Builds the Caramel Base
Brown sugar contains molasses, which gives the sticky topping a deeper, more rounded flavor than white sugar alone would produce.
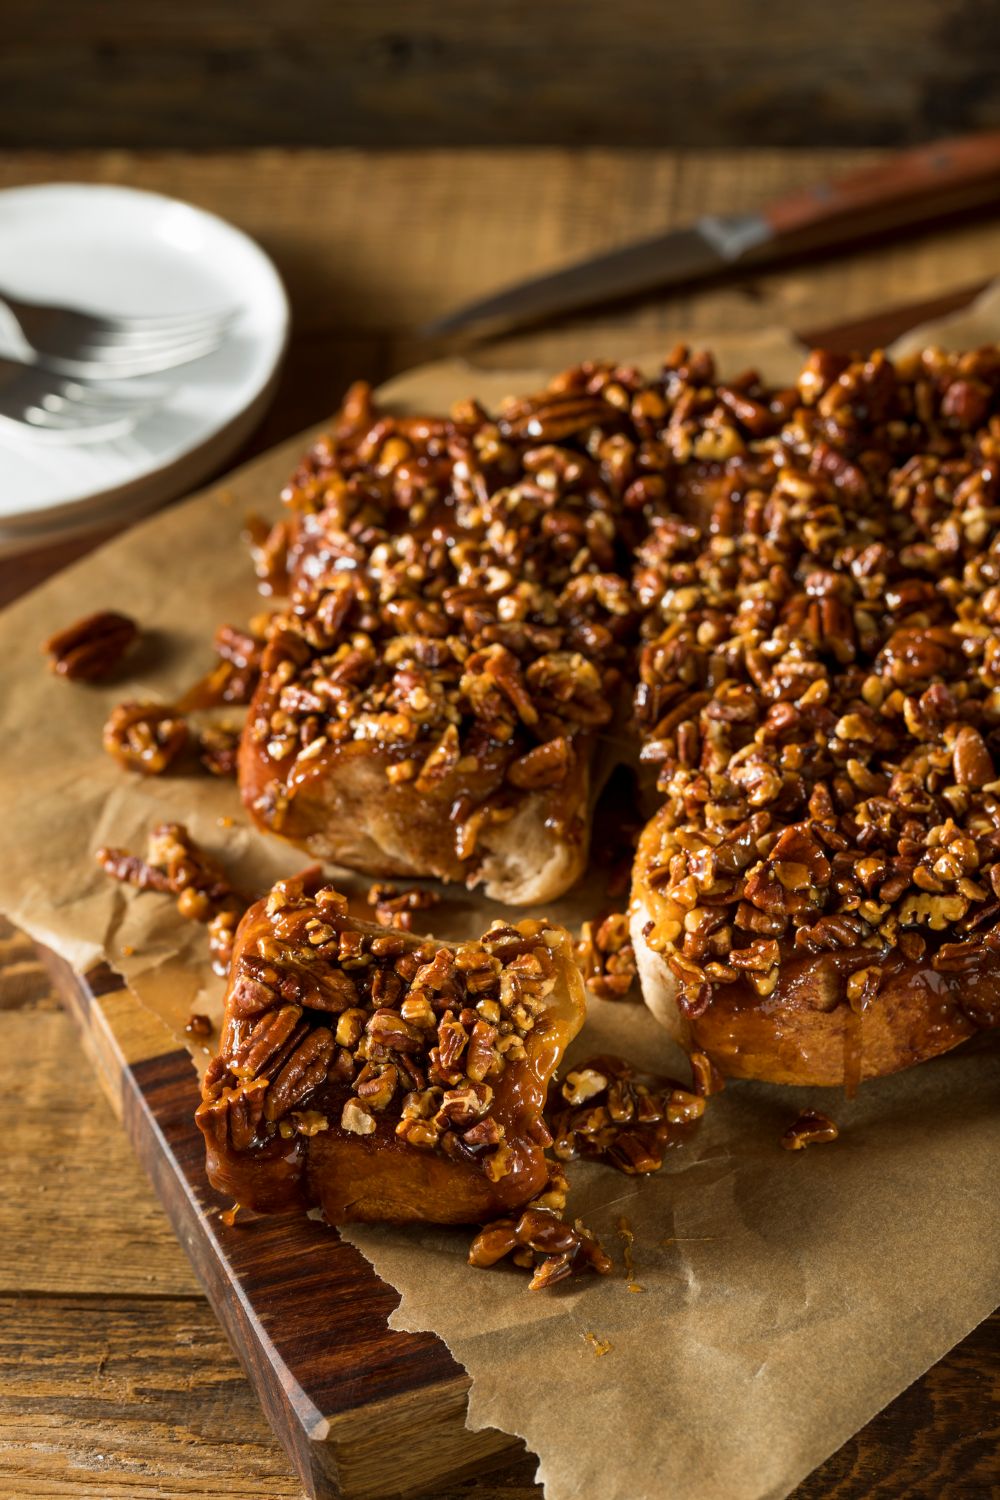
The small amount of water in the topping mixture keeps the caramel base fluid long enough to spread evenly across the bottom of the pan before the buns go in. During baking, it thickens, darkens, and absorbs flavor from the pecan pieces sitting in it, which is why the bottom of the pan after inverting looks nothing like what you poured in. That transformation is the whole point.
The Cinnamon Sugar Filling Needs Pressure
Pressing the sugar mixture firmly into the dough surface before rolling is what keeps the filling attached to the dough through the entire process. Filling that sits loosely on top of the dough will migrate during rolling and baking, leaving dry gaps in the spiral instead of an even cinnamon sugar layer throughout. A few passes with the palm of your hand is enough. You are not kneading it in, just making contact.
Enough Gluten Makes the Difference
Five minutes of kneading with the dough hook attachment is enough time for enough gluten to develop in this enriched dough. Gluten is the protein network that gives the buns their structure and chew.
Under-developed gluten produces buns that are dense and gummy rather than tender with a light pull. You can verify development with the windowpane test: pull a small piece of dough and stretch it slowly. If it stretches thin enough to be slightly translucent without tearing, the gluten is ready. If it tears immediately, give it two more minutes in the mixer.
Products I Use to Bake Pecan Sticky Buns


Pecan Cinnamon Sticky Buns
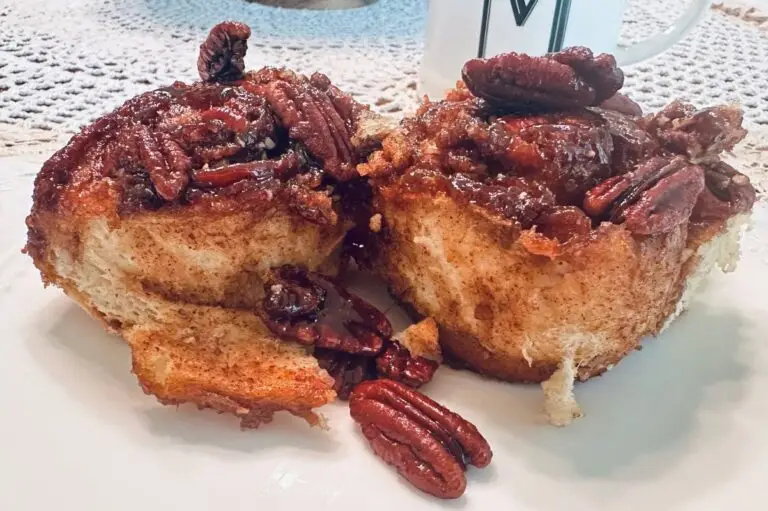
These homemade pecan sticky buns are built on a soft, enriched yeast dough made with warm milk and melted butter, filled with a brown sugar cinnamon and chopped pecan mixture, and baked over a gooey caramel pecan sauce that coats every bun when the pan is inverted. Rooted in the Pennsylvania German schnecken tradition, this scratch-made sticky buns recipe produces pull-apart buns with a lacquered, caramelized finish and tender, fluffy layers throughout.
- Total Time: 2 Hours 50 Minutes
- Yield: 12 Buns 1x
Ingredients
- 2/3 cup warm water
- 2/3 cup warm milk
- 2 tsp active dry yeast
- 2 tbsp white sugar 1 large egg, beaten
- 6 tbsp unsalted butter, melted
- 4 cups all-purpose flour, or more as needed
- 1 1/2 tsp fine salt
- 1/2 cup packed brown sugar
- 1/4 cup white sugar
- 1/4 tsp ground cinnamon
- 1 pinch salt
- 6 tbsp unsalted butter, melted
- 3 tbsp water
- 1 to 1 1/2 cups pecans
- 3/4 cup packed brown sugar
- 1/4 cup finely chopped pecans
- 1 tsp ground cinnamon
Instructions
- Step 1: Proof the yeast
Combine the warm water and warm milk in the bowl of a stand mixer 🛒 and sprinkle the active dry yeast over the surface. Let it sit undisturbed for about 10 minutes. You are looking for a frothy, foamy layer across the top of the liquid. If nothing is happening after 10 minutes, your yeast is either old or your liquid was too hot. Water above 115°F kills active dry yeast. Discard the yeast mixture and start again with fresh yeast and liquid that feels comfortably warm on your wrist, not hot. Eliminate the guesswork by using an instant-read thermometer 🛒. - Step 2: Build the dough
Add the sugar, beaten egg, and melted butter to the yeast mixture. Whisk briefly to combine. Attach the dough hook attachment and add about 75% of the all-purpose flour along with the salt. Mix on medium speed, adding the remaining flour gradually, until a very soft and sticky dough forms. This dough is supposed to be tacky. Resist the urge to add extra flour just because it is sticking to your hands. Too much flour turns a fluffy dough into something dry and dense. Knead in the mixer for about 5 minutes until the dough is smooth and pulls away cleanly from the sides of the bowl. - Step 3: First rise
Transfer the dough to a lightly oiled large bowl and cover tightly with plastic wrap. Set it in a warm spot, such as near a warm oven with just the oven light on, and let it rise until the dough doubles in size, about one hour. The first rise is where flavor develops in the dough. Do not rush it with excess heat, and do not let it go so long that the structure starts to collapse. - Step 4: Make the sticky topping
While the dough rises, combine the brown sugar, white sugar, ground cinnamon, salt, melted butter, and water in a small bowl. Mix thoroughly until smooth and fully combined. Pour into a generously buttered pan and spread evenly to cover the bottom. Scatter the pecans evenly over the caramel base. Set aside until the dough is ready. - Step 5: Make the cinnamon pecan filling
Combine the brown sugar, finely chopped pecans, and ground cinnamon in a small bowl. Stir until thoroughly mixed. Set aside. - Step 6: Roll and fill
Turn the risen dough out onto a lightly floured surface. Lightly flour your hands and press and stretch the dough into a large rectangle, approximately 18×15 inches. Sprinkle the sugar mixture evenly over the dough all the way to the edges, leaving a 2-inch border along the long edge farthest from you. Press the cinnamon sugar lightly into the dough surface with your hands. This keeps the filling in contact with the dough through the roll so it does not shift and leave gaps in the spiral. - Step 7: Shape the buns
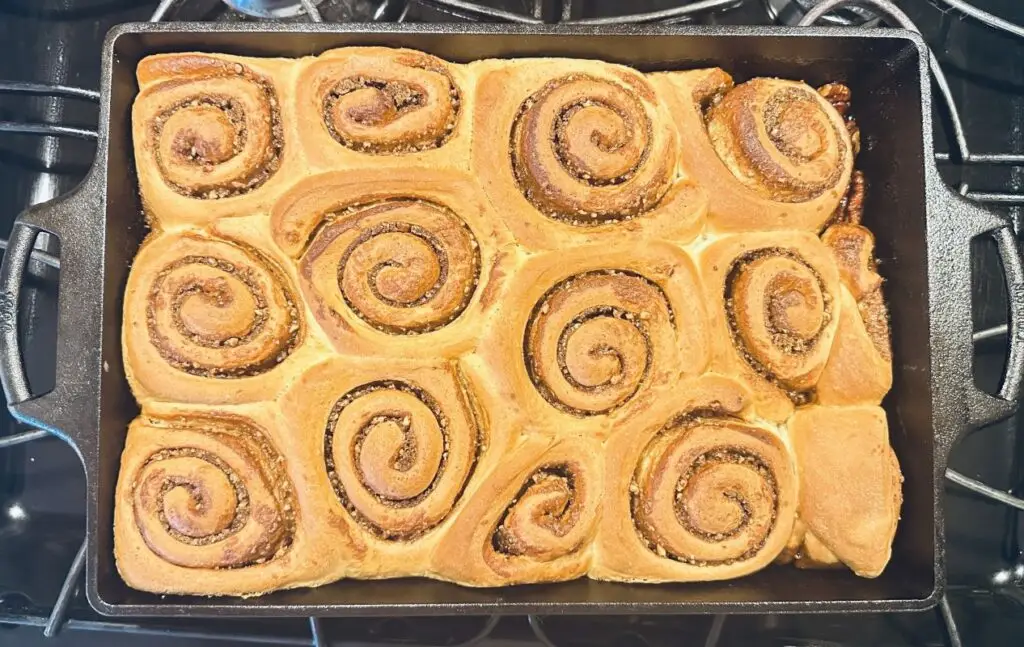
Starting from the long edge closest to you, roll the dough into a cylinder with lightly floured hands. Keep the tension steady throughout but do not roll so tight that the layers have no room to expand during the second rise. Finish with the seam side down and shape the roll as evenly as possible. Use the edge of a knife to lightly score 12 equal portions along the top. To cut without crushing the layers, slide a piece of unflavored dental floss or kitchen string under the roll at each score mark, bring both ends up, cross them over the top, and pull outward in opposite directions. A sharp serrated knife also works cleanly if you cut with one confident stroke rather than sawing. - Step 8: Second rise
Arrange the cut buns spiral side up in the prepared pan in three rows of four. If one side of a bun looks doughier than the other, place the doughier side facing up. Tent the pan loosely with foil and set in a warm place until the buns have nearly doubled in size again, about 45 minutes to one hour. Hold onto the foil in case you need it near the end of baking. - Step 9: Bake
Bake in a preheated oven at 375°F for approximately 35 minutes. Check the tops at the 25-minute mark. If they are getting too golden brown before the buns are baked through, tent loosely with the foil for the final 5 to 10 minutes of baking time.
- Step 10: Invert and serve
Remove the pan from the oven onto a wire rack and let it rest for exactly 5 minutes. Do not wait longer. The caramel base needs that brief window to stop actively bubbling before you flip, but if it cools completely in the pan it will bond to the surface. Carefully invert the pan onto a large serving platter. Use a spoon to transfer any sticky topping that stays behind in the pan back onto the buns. Let cool slightly and serve warm.
- Prep Time: 30 Minutes
- Rise Time: 1 Hour 45 Minutes
- Cook Time: 35 Minutes
- Category: Breakfast
- Method: Baking
- Cuisine: American, German
How to Make Perfect Pecan Sticky Buns Every Time
Choose Your Pan
A 9x13-inch baking pan 🛒, a large round cake pan, or a well-seasoned cast iron skillet all work for this recipe. A metal baking pan conducts bottom heat efficiently and produces a well-set caramel base. A glass baking dish works but heats more unevenly, so watch the bottom heat in the final 10 minutes and add foil to the top earlier if needed.
A cast iron pan 🛒 produces excellent bottom caramelization if you have one, but it is an upgrade, not a requirement. Whatever pan you use, butter it generously before adding the caramel topping.
Do Not Rush the Rise Time
Both the first rise and the second rise need to complete fully before you move to the next step. During the first rise, the dough should double in volume and feel light and airy when pressed. During the second rise, the shaped buns in the pan should be visibly puffy and nearly touching each other. Baking under-proofed buns produces dense, gummy layers with no spring. If your kitchen runs cold, a warm spot near the oven with the oven light on provides consistent, gentle warmth without overheating the dough.
Watch Your Flour
The most common mistake with this soft dough is adding too much flour during mixing. The dough will feel sticky, and that is correct. Sticky dough bakes into soft, fluffy buns. Stiff dough bakes into dry, heavy ones. Add flour gradually and stop the moment the dough pulls away from the sides of the bowl cleanly. If you need grip while shaping on a lightly floured surface, use a tiny bit of oil on your hands instead of reaching for extra flour.
Cut With Twine, Not Just a Knife
A knife pressing straight down on the rolled cylinder compresses the layers before the bun even reaches the pan. Kitchen twine 🛒 cuts cleanly by pulling outward rather than pressing downward, leaving the spiral intact. This technique works for classic cinnamon rolls and any other rolled dough, so add it to your standard practice.
If you prefer a knife, use a sharp serrated knife and cut in a single smooth stroke without any back-and-forth sawing motion.
Invert After Some Cooling Time
Let the pan rest for 5 to 10 minutes after it comes out of the oven. The caramel needs that window to stop its active boil and thicken enough to cling to the buns when the pan flips.
Invert too soon and the caramel is too thin and runny to coat properly. Wait too long and it hardens against the pan surface and will not release cleanly.
If the caramel does firm up before you get to it, return the pan to a 300°F oven for 3 to 5 minutes to loosen it, then invert promptly. You can also place the pan over medium heat on the stovetop for 30 to 45 seconds to loosen it before flipping.
Recipe Variations, Serving Ideas, & Storage
Recipe Variations
Frequently Asked Questions
A 9x13-inch metal baking pan is the most practical choice for homemade pecan sticky buns because it fits 12 buns evenly, conducts bottom heat efficiently, and is easy to invert onto a serving platter.
A large round cake pan also works well. A well-seasoned cast iron skillet produces excellent bottom caramelization if you already own one, but it is not required.
A glass baking dish is the least ideal option because it heats unevenly, though it will still produce good buns if that is what you have. I personally use a 9x13 cast iron pan 🛒.
Instant yeast can be used in this pecan sticky buns recipe without the 10-minute proofing step. Add it directly to the flour rather than blooming it in the warm liquid first, and reduce the quantity by about 25 percent since instant yeast is more concentrated than active dry yeast. The rise time may also be slightly shorter, so watch the dough rather than relying strictly on the clock.
Properly risen dough doubles in visible volume and feels light and airy when you gently press one finger about half an inch into the surface. The indent should spring back slowly but not fully snap back.
If it springs back immediately, the dough needs more time. If the indent stays completely flat, the dough has over-proofed and lost some of its structure, though it will still bake into a reasonable result.
Dense pecan sticky buns almost always point to one of three causes: the yeast was not fully active before mixing, the dough did not complete the first rise or second rise fully, or too much flour was added during mixing.
Check each of those variables on your next batch. The dough should be noticeably soft and slightly tacky when fully developed. If it feels stiff before shaping, it already has too much flour.
Homemade pecan sticky buns can be made entirely by hand without a stand mixer 🛒. Mix the dough in a large bowl with a wooden spoon until it comes together, then turn it out onto a lightly floured surface and knead for 8 to 10 minutes.
You are looking for a smooth, slightly tacky dough that passes the windowpane test, meaning a small piece stretches thin and translucent without tearing. This takes more physical effort but produces the same result.
Pecan sticky buns can be fully prepped the night before through the shaping and pan-loading step. After arranging the cut buns in the prepared pan, cover tightly with plastic wrap and refrigerate overnight instead of completing the second rise at room temperature.
The next morning, pull the pan and let it sit out for 45 to 60 minutes before baking. This cold fermentation approach actually develops more flavor in the dough than a same-day rise.
The key to a clean inversion is timing. After pulling the pan from the oven, rest it for exactly 5 minutes on a wire rack, then invert promptly onto your serving platter.
Waiting longer allows the caramel to cool and harden against the pan surface. If the caramel does set before you get to it, place the pan over medium heat on the stovetop for 30 to 45 seconds to loosen it before flipping.
Freezing pecan sticky buns before baking is possible but requires extra attention to the rise. After shaping and loading the buns into the prepared pan, cover tightly and freeze before the second rise.
When you are ready to bake, transfer to the refrigerator the night before to thaw slowly, then let the pan sit at room temperature for one to two hours until the buns are visibly puffy before baking. Baking from fully frozen without a thaw step will produce underdone, gummy centers.
The windowpane test is a reliable way to confirm that the gluten in your yeast dough has developed enough structure to support a good rise and a light, tender crumb. Pull a small piece of dough and slowly stretch it between your fingers.
If it stretches into a thin, nearly translucent sheet without tearing, the gluten network is well developed and the dough is ready to rise.
If it tears immediately, knead for another two to three minutes and test again. This test applies to any enriched yeast dough, not just pecan sticky buns.
Pecan sticky buns stay fresh at room temperature for up to two days when stored in an airtight container or wrapped tightly in plastic wrap. Refrigerated buns keep for up to four days and reheat well in a 300°F oven for about 10 minutes.
For longer storage, wrap individual buns in plastic wrap, place in a freezer-safe container, and freeze for up to two months. Thaw overnight in the refrigerator before reheating.
Pin This Homemade Pecan Sticky Buns Recipe For Later
Baking Sticky Buns is a System Worth Learning
Once you understand how an enriched yeast dough behaves, how the caramel base works during baking, and what a properly proofed bun looks like before it goes into the oven, you are not just making one recipe; you are building the core knowledge that carries over into dinner rolls, cinnamon buns, pull-apart breads, and any other sweet roll recipe you attempt from this point forward. Learn the system and the individual recipes get easier every time.
If you make these pecan sticky buns, please leave a rating and review below. Tell me what pan you used, whether you tried the overnight version, and whether anyone in your house actually stopped at one. I already know the answer, but I want to hear it anyway.
0 comments