If you have ever stood at a cutting board with a raw chicken and felt genuinely lost, this is the guide that fills in everything recipes leave out. Every chicken recipe worth making assumes you already know the basics: safe handling, how to read doneness, what all those parts at the butcher counter actually are, and why your oven temperature might be lying to you.
Most recipes that teach you how to cook chicken for beginners skip straight to the ingredient list and assume the rest is obvious. The best mid-twentieth century home cookbooks disagreed. They opened with a complete fundamentals chapter covering safe handling, parts identification, and doneness tests before a single recipe appeared. That foundation is what this guide brings back.
The smell of chicken roasting on a Sunday afternoon is one of the most specific, grounding memories in American home cooking. Garlic and butter, the hiss of a hot skillet, a parent or grandparent checking the bird without a thermometer because they simply knew. You are about to understand how they knew, and it is far more learnable than it looks from the outside.
This post contains affiliate links. If you click one and make a purchase, I may earn a small commission at no extra cost to you. I only recommend tools I'd genuinely use in my own kitchen, and everything listed here has earned its spot through actual cooking, not a sales pitch.
Back in the Day: When the Book Started Before the Recipes
For most of the mid-twentieth century, learning to cook chicken meant starting from the foundation, not from a recipe. Home economics was a required course in American high schools from the 1940s through the 1970s, and the cookbooks sitting on kitchen shelves alongside those classes - Joy of Cooking, the Betty Crocker Picture Cook Book, and dozens of church and community compilations - routinely opened with chicken fundamentals before a single recipe appeared. Safe handling, technique vocabulary, how to read doneness: all of it came first.
Chicken itself was changing during this same period. In the early 1940s, a whole roasted bird was still considered a Sunday luxury. By the mid-1950s, better refrigeration and commercial farming had brought chicken to weeknight dinner tables across the country, and a whole generation of first-time cooks needed to learn how to handle it. The guides they used were practical, thorough, and written with no assumption that the reader already knew anything. That same respect for a reader's starting point is exactly what this post brings forward.
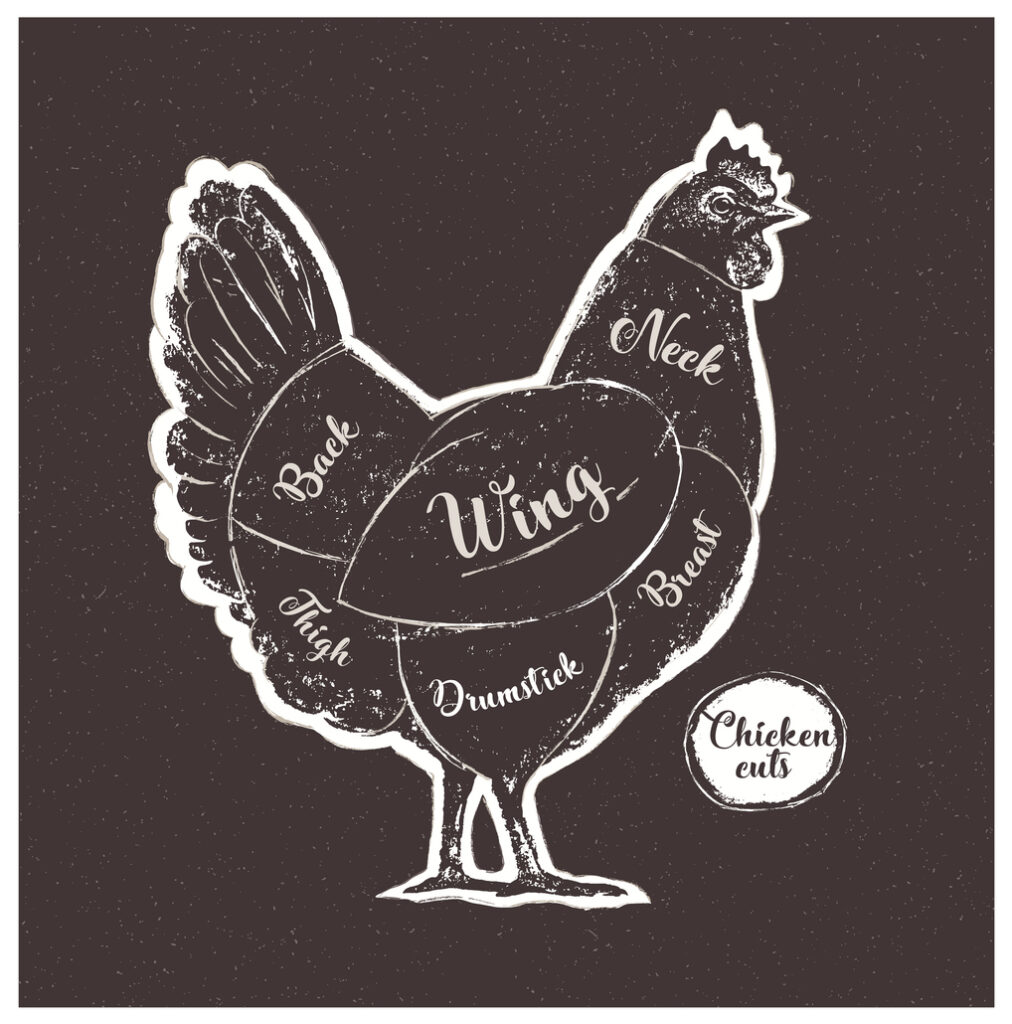
Buying and Sizing Your Chicken
Chicken thighs and drumsticks are dark meat, and dark meat is the most forgiving cut in the case. It has more fat than the breast, tolerates higher heat without drying out, and stays juicy across a wider range of cooking times. A boneless chicken breast, by contrast, is lean and cooks fast, which makes it ideal for quick weeknight methods but less forgiving if the heat runs too high.
When buying whole boneless breasts, plan to pull off the skin and cut each whole breast in half before you begin cooking. Most recipes that list "whole boneless breasts" are built around that step, even when they do not explicitly mention it.
If you want the convenience of already-cooked chicken for a salad, soup, or casserole, a rotisserie chicken from the grocery store is one of the easiest ways to skip the prep entirely. The meat pulls cleanly from the bones in minutes, and the carcass makes an excellent base for stock.
Chicken Safety: The 10 Rules That Protect Your Kitchen
Chicken is highly perishable, and the bacteria it can carry are serious. These are the fundamentals that every confident home cook follows without exception.
- Refrigerate raw chicken immediately and store it so it cannot drip onto other foods in the refrigerator.
- Wash your hands before and after handling raw chicken.
- Skip rinsing raw chicken. It feels like the right thing to do, but water picks up bacteria from the chicken's surface and splashes it onto your sink, countertops, and anything else nearby. A 2019 USDA study found that 60% of people who rinsed chicken had bacteria in their sink afterward. Cooking to the correct internal temperature is what kills bacteria, not water.
- Clean every surface that contacts raw chicken or its juices, including countertops, cutting boards, knives, appliances, and sponges, with warm water and soap before using them again.
- Keep a separate, nonporous cutting board designated for chicken only.
- Defrost chicken in the refrigerator. Never defrost at room temperature.
- Cook raw chicken within one or two days of purchasing. If it smells off before that mark, discard it or return it. Many bacteria that cause food poisoning have no odor at all, so safe handling applies regardless of smell.
- Cook chicken thoroughly. (The next section covers exactly what that means.)
- Refrigerate cooked chicken as quickly as possible after serving. Never leave it at room temperature for more than two hours. In summer heat, that window shrinks.
- Never place cooked chicken back onto a plate or container that previously held raw chicken unless you have washed it first.
Freezing and Thawing Properly
If you cannot cook your chicken within two days of purchasing, it belongs in the freezer. Wrap the original packaging tightly in a layer of heavy-duty aluminum foil or place it in a freezer-safe bag to prevent freezer burn. Chicken parts freeze beautifully for up to nine months, and whole chickens last up to a year. When it is time to cook, thaw the meat completely in the refrigerator. Never refreeze raw chicken that has been thawed.
Your Cutting Board Is Doing More Work Than You Think
Pulling out the wrong cutting board is one of the most common cross-contamination mistakes in a home kitchen. Porous wooden boards absorb raw chicken juices and are extremely difficult to fully sanitize once that happens. A nonporous board keeps bacteria on the surface where soap and hot water can actually reach it. When raw chicken prep goes sideways, the board is usually where the problem started.
Getting a dedicated board that actually stays put during fast prep work is a practical fix that costs almost nothing to solve. A nonporous cutting board with juice grooves keeps raw chicken liquid contained and prevents the board from sliding mid-cut, which means your prep station stays controlled from the first slice to the last.
How to Prepare Raw Chicken Before Cooking
Three Additional Preparation Techniques Worth Understanding
Your Oven and What It Is Actually Doing
When you set your oven to 350°F, ideally it should heat to 350°F, but many home ovens don't. An oven running 25 degrees hotter than its thermostat reads can mean the difference between golden skin and burnt skin, or between properly cooked thigh meat and a dried-out breast.
Place an oven thermometer in the center of your oven, turn on the heat, wait 15 minutes, then close the door and wait 10 more minutes before reading it. Repeat this process a few times to understand whether your oven runs hot, cold, or inconsistently. Once you know the pattern, you can adjust your thermostat setting accordingly. An oven that consistently runs more than 25 degrees off should be calibrated by a professional.
Classic Chicken Cooking Techniques, Explained
How to Tell When Chicken Is Fully Cooked
This is the single most anxiety-producing moment for new home cooks, and it has a clear, repeatable answer.
Tools That Make Chicken Cooking More Reliable
Quick note: some links in this section are affiliate links. If you buy through one, I earn a small commission at no extra cost to you. These are the tools that show up in my own kitchen. I'd point you to them regardless.
These are the specific tools that show up repeatedly in chicken cooking, and each one solves a problem that is very easy to diagnose once you have cooked chicken a few times.
- Instant-read thermometer: Eliminates guessing about doneness. Insert into the thickest part without touching bone for an accurate reading in seconds.
- Nonporous cutting board with juice grooves: Contains raw chicken juices during prep and sanitizes completely without absorbing bacteria.
- Meat mallet: Pounds chicken breasts to even thickness so they cook consistently from edge to center.
- Oven thermometer: Reads your actual oven temperature rather than what the dial claims, so every recipe you follow becomes more predictable.
- Heavy-gauge skillet: A heavy-gauge skillet distributes heat the way cast iron does in a properly seasoned pan. If you do not already own one, this cast iron guide covers everything from choosing your first pan to building seasoning that lasts decades.
Frequently Asked Questions
The USDA recommends cooking all chicken, including whole birds, individual parts, and ground poultry, to a minimum internal temperature of 165°F. More conservative guidelines suggest cooking breast meat to at least 170°F and thigh meat to between 185°F and 190°F. Measure temperature at the thickest part of the meat, with the probe clear of any bone.
For a whole roasted chicken, three traditional tests confirm doneness without a thermometer. The drumstick should move freely when you lift or twist it. The juices should run completely clear with no pink when you pierce the skin near the thigh. The thigh meat should feel firm rather than soft when you pinch it lightly. These tests are less practical for chicken cooked with sauce or buried in a braising dish, where the meat is not easily accessible.
Raw chicken should be cooked within one to two days of purchasing and stored so it cannot drip onto other refrigerator contents. If the chicken smells off before the two-day mark, discard it or return it to the store. Keep in mind that many bacteria responsible for food poisoning are completely odorless, which is why safe handling applies regardless of how fresh the chicken smells.
Roasting and baking both use dry oven heat and are functionally the same technique applied to poultry. The practical distinction is that roasting leaves the chicken uncovered throughout, which produces crispy, deeply browned skin. Baking may involve covering the chicken for part or all of the cooking time, which traps steam and results in more tender, moist meat that pulls easily from the bone.
Yes. While chicken benefits significantly from marinating several hours or overnight, leaving it in an acidic marinade for more than 24 hours begins to break down the muscle structure and produces a mushy, unpleasant texture. Marinades containing lemon juice, vinegar, wine, or buttermilk are particularly fast-acting. Aim for a minimum of 2 hours and a maximum of 24 hours for best texture and flavor.
Chicken breasts are lean, fast-cooking muscle with little intramuscular fat and minimal connective tissue. That lean composition means they lose moisture quickly as the internal temperature climbs. Thighs contain more fat and collagen, which keep the meat moist over longer cooking times and at higher temperatures. That fat and collagen also contribute significantly more flavor to the finished dish, which is why many experienced home cooks reach for thighs first when they want forgiving results.
Brining means soaking chicken in a solution of salt and water before cooking. The salt draws moisture into the meat through osmosis and seasons it from the inside out, which helps the chicken retain juiciness during cooking. A basic brine uses roughly 1/4 cup of kosher salt dissolved in 4 cups of water. Brine chicken parts for 30 minutes to 2 hours and a whole bird for up to overnight in the refrigerator. For chicken that tends to dry out in your oven, brining is one of the most effective fixes available.
Oven-frying means coating chicken in breadcrumbs and baking it in a hot oven to create a crispy exterior without submerging it in oil. The result mimics the texture of deep-fried chicken without requiring large amounts of cooking oil or the cleanup that follows deep-frying. Traditional deep-frying cooks the chicken by submerging it in oil heated to around 350°F, which cooks from all sides simultaneously and produces an exceptionally crispy crust. Oven-frying is easier to manage at home and far less messy.
Most vintage chicken recipes are built around a 3 to 4-pound broiler/fryer, which is still the most widely available size in grocery stores today. A 3.5-pound bird serves 3 to 4 people. For 6 people, plan on 2 whole chickens or a larger number of parts. When buying chicken parts, serve at least 2 pieces per person, and adjust upward if the pieces are small or the appetites around your table are large.
To pound a chicken breast flat, place it rough-side up on a firm cutting board or countertop. Hit firmly with the flat surface of a meat mallet, pushing the flesh outward toward the edges. When the thicker center sections resist flattening, whack them lightly with the edge of the mallet to break down the fibers, then resume flat pounding. Work from the center outward in steady strokes rather than hammering repeatedly in one spot. A properly pounded breast should be roughly the same thickness from one end to the other.
The Part That Changes Everything
Every intimidating moment in learning to cook chicken comes back to one thing: not knowing what you are actually looking for. When you understand what golden looks like versus just cooked, what 165°F actually means in the context of your kitchen and your oven, and why a thigh needs more time than a breast, the raw bird on your cutting board stops being a mystery. It becomes an ingredient.
Did your first attempt at a roasted chicken teach you something the recipe never mentioned? Leave it in the comments below. Those lessons are worth far more than any single tip in a guide.
If this helped you feel more confident with chicken in the kitchen, please leave a rating and a comment below and let us know what you are making first!

0 comments