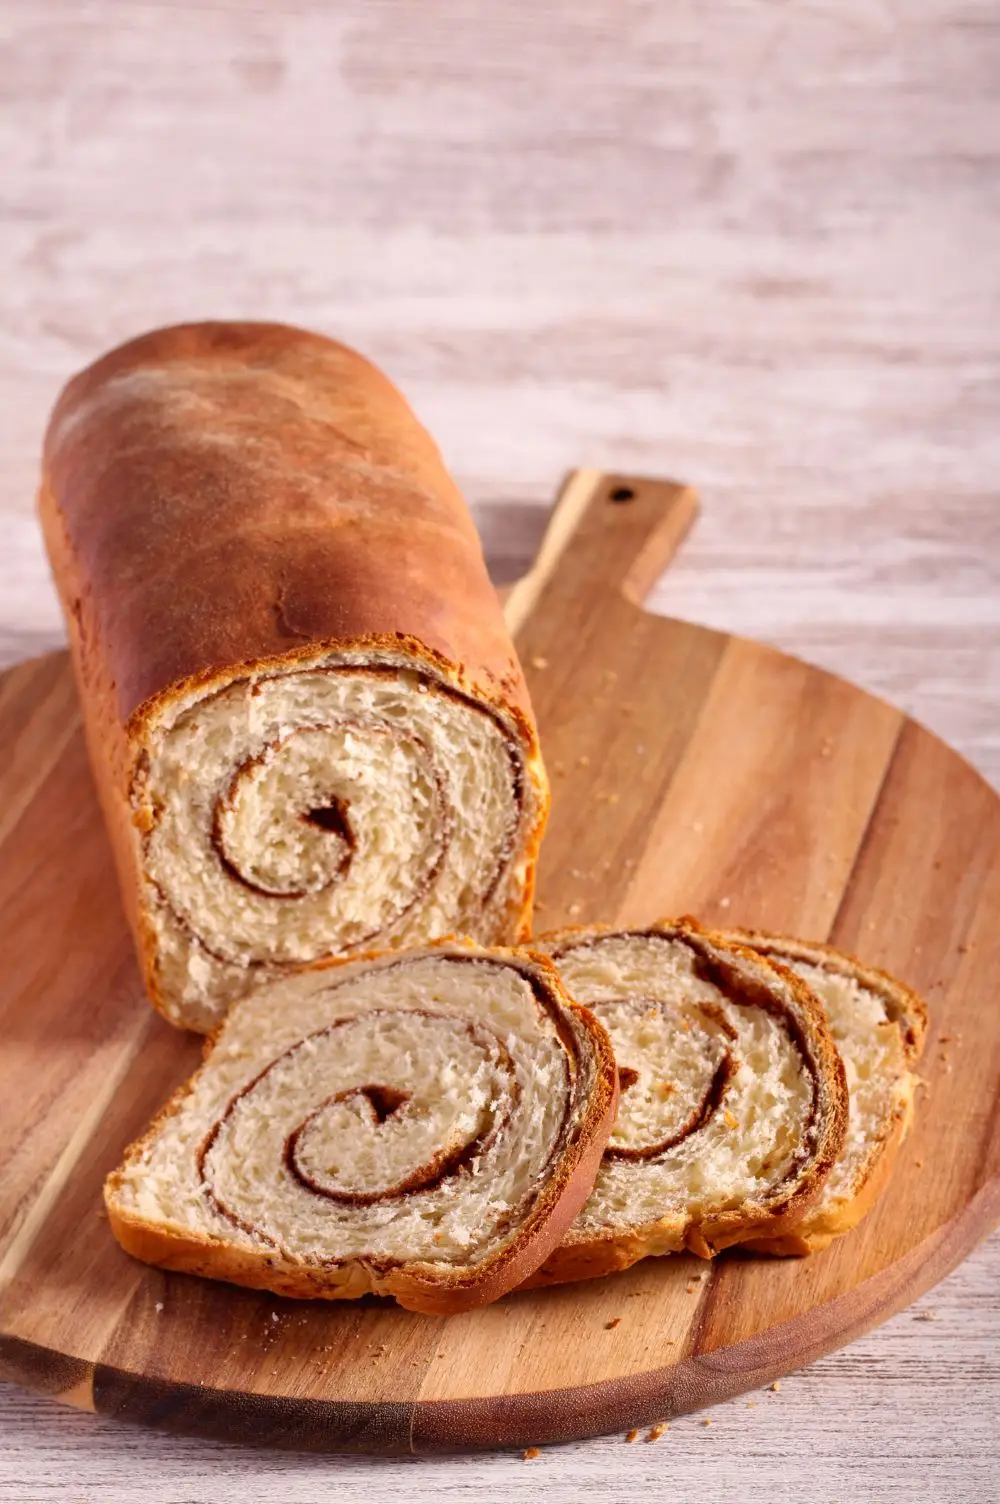
Homemade cinnamon swirl bread is one of those recipes that looks more complicated than it is, and most food content is happy to keep it that way. You make two full loaves from a single batch of enriched yeast dough, whole milk, active dry yeast, eggs, and a cinnamon sugar mixture rolled and pressed directly into the dough before it shapes into a loaf.
The typical failure with yeast bread comes down to two things: adding too much flour out of nerves and not knowing what properly proofed dough actually looks like. Both of those problems have straightforward fixes, and this post covers both.
By the time you pull these loaves out of the oven, you will understand yeast dough well enough that most bread recipes stop feeling like a gamble. You got this.
What Causes Dense Cinnamon Bread & How to Avoid It
The most important thing: Do not over-flour the dough.
Yeast dough that feels slightly tacky after 5 to 7 minutes of kneading is not broken. That is correct dough. The instinct to add more flour because something feels sticky is the single most reliable way to produce a dense, dry loaf that nobody asks for twice.
Flour added past what the recipe calls for tightens the gluten, absorbs the moisture the milk and eggs put in, and turns what should be a soft, pillowy crumb into something closer to a brick with a nice crust.
Why this works: Whole milk adds fat and protein that soften the crumb and give the bread a slightly rich flavor. The eggs add structure and hold the swirl together during baking. Both of those contributions disappear the moment you add extra flour to compensate for normal dough stickiness.
What to look for: At the end of kneading, the dough should pull cleanly away from the sides of the bowl and form a smooth ball. Pinch off a small piece and stretch it slowly between your fingers. If it stretches thin without tearing, the gluten is developed and the dough is ready. If it tears immediately, knead for 2 more minutes and test again.
What this teaches you for next time: Once you know what properly developed yeast dough feels like in your hands, you stop second-guessing every bread recipe you attempt. That tactile knowledge transfers directly to cinnamon rolls, dinner rolls, and any other enriched dough. One recipe, one skill set you keep forever.
Homemade Cinnamon Swirl Bread Recipe
Rooted in the American tradition of enriched sweet breads that home bakers made long before grocery store loaves crowded them out, this homemade cinnamon swirl bread uses whole milk, active dry yeast, and a rolled cinnamon sugar swirl pressed directly into the dough before shaping. The formula produces two full loaves baked in cast iron bread pans, with a soft, pillowy crumb and a defined cinnamon sugar swirl in every slice. Unlike cinnamon swirl quick bread, which uses baking powder and skips the yeast entirely, this is a true yeast bread with a proper first rise and second proof, giving it the kind of structure and flavor that a quick bread simply cannot replicate.
- Total Time: 3 Hours
- Yield: 2 Loaves 1x
Ingredients
- 1 cup whole milk, room temperature
- 2 1/4 tsp active dry yeast
- 1/3 cup granulated white sugar
- 1 tsp kosher salt
- 2 large eggs, beaten with 1 Tbsp water
- 4 cups all-purpose flour
- 1 Tbsp ground cinnamon
- 1 cup raisins (optional)
- 1/3 cup granulated white sugar (or dark brown sugar for a deeper, thicker swirl)
- 2 Tbsp ground cinnamon
- Unsalted butter, for greasing (two 9x5" cast iron loaf pans)
Instructions
- Step 1: Activate your yeast
Pour the whole milk into a large bowl. Add the active dry yeast and the granulated sugar. Whisk them together thoroughly. Set the bowl aside for 10 minutes. You are looking for a foamy, slightly fragrant surface that tells you the yeast is active and ready to work. If you see no foam after 10 minutes, your yeast is either expired or the milk was too cold or too warm. Room temperature milk is the target, around 70°F. Anything above 110°F and you are killing the yeast before it gets started. - Step 2: Build your dough
In the bowl of a stand mixer, combine the all-purpose flour, kosher salt, and ground cinnamon. Give the dry ingredients a quick stir to distribute the cinnamon evenly. Make a well in the center of the dry ingredients. Pour in the yeast mixture and the beaten egg mixture. Using the dough hook attachment, knead on low speed for 5 to 7 minutes. The dough will pull away from the sides of the bowl and form a smooth, slightly tacky ball. Do not add more flour if it feels a little sticky at the start. Sticky dough early in kneading is normal and expected. Too much flour is the single most common reason homemade bread turns out dry and dense. - Step 3: First rise
Liberally grease a large bowl with unsalted butter. Place the dough into the bowl and turn it once so the surface is lightly coated. Set the bowl inside your oven (oven is off) alongside a 4-cup measuring cup filled with boiling water. The steam from the water creates a warm, humid environment that encourages a steady, even first rise. Close the oven door and leave it undisturbed for 1 hour. At the end of the hour, the dough should be visibly doubled in size. - Step 4: Prepare your swirl mixture and pans
While the dough finishes its first rise, mix together the cinnamon sugar mixture for each loaf. In a small bowl, combine 1/3 cup sugar and 2 Tbsp ground cinnamon. Stir until fully combined. If you want a darker, richer swirl with a more pronounced flavor, swap the white sugar for dark brown sugar. Liberally grease two 9×5″ cast iron bread loaf pans with unsalted butter, coating the bottom and all sides completely. A well-greased pan is how you get a clean release. A poorly greased pan is how you lose the bottom crust of a loaf you worked on for three hours. Use enough butter. - Step 5: Shape and fill
Punch down the dough and turn it out onto a lightly floured work surface. Divide the dough in half. Working with one piece of dough at a time, roll it out into a rectangle approximately 9×5 inches and about 1/4″ thick. Sprinkle the cinnamon sugar mixture evenly across the entire surface of the rectangle, leaving no large bare spots. Take your rolling pin and gently roll it across the surface, pressing the cinnamon mixture into the dough so it adheres rather than spilling out during rolling. Starting at a narrow side of the rectangle, roll the dough toward you in a tight, even log. Pinch the seam side closed firmly. Set the log seam side down into the prepared loaf pan. Repeat with the second loaf. - Step 6: Second rise
Place both prepared loaf pans back inside the oven (still off) with a fresh 4-cup measuring cup of boiling water for steam. Close the door and allow the loaves to proof for 30 to 45 minutes, or until the dough has risen to the top of the pans and looks slightly domed. Dust the tops lightly with a small pinch of ground cinnamon before baking. Do not skip this second proof. It is what gives you a light, open crumb instead of a tight, heavy loaf. - Step 7: Bake
Remove the loaves and the water from the oven. Preheat the oven to 350°F. Once the oven reaches temperature, place both pans on the center rack. Bake for 32 to 34 minutes, or until the tops are deep golden brown. When in doubt, a light tap on the top of the loaf should produce a slightly hollow sound, which tells you the interior has set properly. - Step 8: Cool before slicing
Remove the pans from the oven and leave the loaves in the pans on a wire rack for 10 minutes. Then turn the loaves out and place them directly on the wire rack, right side up. Allow them to cool for a minimum of 1 hour before slicing. Cutting into hot yeast bread compresses the crumb and makes the interior gummy. The bread finishes setting as it cools. One hour is the floor, not the ceiling. If you can wait longer, wait.
- Prep Time: 30 Minutes
- Rise Time: 1 Hour 45 Minutes
- Cook Time: 34 Minutes
- Category: Bread
- Method: Baking
- Cuisine: American
Pin This Cinnamon Swirl Bread Recipe For Later
Why This Cinnamon Swirl Bread Recipe Works
Whole Milk Over Water
Water is the default in bread recipes because it is cheap and neutral. Whole milk changes the result in ways that are not subtle. The fat coats the gluten strands during kneading and produces a softer, more tender crumb.
The natural sugars in milk contribute to a deeper golden crust in the oven. Put a milk-based cinnamon bread next to a water-based one and the difference is visible before you even slice them.
Cinnamon Built Into the Dough
Most recipes put cinnamon only in the swirl. Building a full tablespoon into the dry ingredients gives the entire crumb a warm, aromatic background note. The bread tastes complete all the way through, not just in the spiral. It is a small change with a noticeable payoff, and it costs nothing extra to do.
Steam Proofing Instead of Counter Proofing
Covering dough with plastic wrap and leaving it on the counter works. Steam proofing inside a closed oven with a cup of boiling water works better. The steam prevents the surface of the dough from forming a dry skin that restricts the rise and toughens the outer layer. The environment stays consistently warm and humid regardless of what your kitchen is doing.
If you bake in a cool house or a drafty kitchen, this method is highly recommended. It is the best way to get a reliable, even rise every single time.
The Rolling Pin Press on the Swirl
Pressing the cinnamon sugar mixture into the dough with a rolling pin before you roll the loaf is not decorative. Swirl that is sprinkled on without being pressed tends to slide during shaping, pool at the bottom of the pan, or burn before the bread is fully baked. One pass with a rolling pin presses it into the dough surface so it stays put through the second rise and the full bake. Skip it and you are gambling on the swirl.
Cast Iron Loaf Pans 🛒
Cast iron holds and distributes heat evenly in a way that thinner aluminum pans cannot match at home oven temperatures. The result is a crust that bakes uniformly golden brown on all four sides without scorching the bottom or leaving the sides pale and soft.
If a standard aluminum loaf pan 🛒 is what you have, use it. This bread bakes correctly in aluminum and the crumb and swirl will be identical. Grease the pans thoroughly with butter either way. Cast iron is worth adding to your kitchen eventually, but it is not a requirement for a good loaf today.
If you want to know more about baking with cast iron before you commit to a pan, my cast iron baking guide covers everything from performance, seasoning, care and maintenance, to which pans are a generational investment.
How to Make Perfect Cinnamon Swirl Bread
Use Room Temperature Milk, Not Warm Milk
Warm milk is standard advice in a lot of yeast bread recipes. The problem is that home cooks routinely overshoot it and kill the yeast before the dough is even mixed.
Room temperature milk, around 70°F, activates the yeast steadily and without any risk. Give it 10 minutes with the sugar and you will see foam on the surface. That foam is your confirmation. No foam means the yeast is dead or the milk was off temperature, and you should start over before you waste four cups of flour.
Spoon and Level Your Flour
Scooping flour directly from the bag with a measuring cup compacts it. You are likely adding 20 to 30 percent more flour than the recipe requires every single time you do it. Spoon the flour into the measuring cup and level it off with a straight edge.
That one adjustment is often the entire difference between a soft homemade cinnamon swirl bread and a dense one. It costs nothing and takes three extra seconds.
Press the Seam Before It Goes in the Pan
When you roll the dough log and pinch the seam side closed, use real pressure with your fingertips. A loosely pinched seam opens during the second rise or early in baking, the swirl separates, and the loaf looks split rather than clean.
Set it seam side down in the greased loaf pan immediately after shaping. The pan holds it in place through the proof and the bake.
Leave the Oven Alone
Every time you open the oven during baking, you drop the temperature and disrupt the bake. Set your timer for 32 minutes, close the door, and walk away.
Check it when the timer goes off. If the tops are golden brown and the loaves sound slightly hollow when tapped on top, they are done. Opening the door early to check does not speed anything up. It just introduces problems.
Pull at Golden Brown
Cinnamon sugar burns faster than plain bread dough. If the tops are darkening too quickly before the interior is set, lay a loose sheet of foil over the pans for the last 5 to 8 minutes.
Golden brown is the target. Past that, the sugars have gone into bitter territory and no amount of butter on a warm slice is going to fix it.
Recipe Variations, Serving Ideas, & Storage
Recipe Variations
Tools & Ingredients Worth Having For This Recipe


Frequently Asked Questions
Dense homemade cinnamon swirl bread almost always traces back to too much flour in the dough. Scooping flour directly from the bag packs the cup and adds significantly more than the recipe requires. Use the spoon-and-level method.
The second most common cause is under-proofing. If the dough has not visibly doubled during the first rise, it is not ready to shape. Give it more time and check again rather than moving forward on the clock alone.
Yes. Instant yeast 🛒 skips the 10-minute activation step in liquid. Add it directly to the dry ingredients and proceed with the recipe. Use the same quantity. The rise time may run slightly shorter, so watch the dough rather than relying strictly on the clock.
Cinnamon swirl quick bread uses baking powder for leavening and requires no rise time. It bakes faster and produces a dense, cake-like crumb.
The homemade cinnamon swirl bread recipe here uses active dry yeast, a first rise, and a second proof in the pan. The result is a fundamentally different texture: softer, more structured, with a chewier crumb that holds the swirl cleanly in every slice.
Press the cinnamon sugar mixture into the dough with a rolling pin before rolling the log, and roll the log snugly with no loose gaps. A loose roll creates air space where the swirl separates during the rise and the bake.
Pinch the seam firmly and set it seam side down in the pan immediately. Those three steps together prevent the gap.
Yes. Mix the wet and dry ingredients in a large mixing bowl until a shaggy dough forms, then turn it out onto a lightly floured work surface and knead by hand for 8 to 10 minutes.
The dough is ready when it is smooth, slightly tacky, and passes the stretch test. It takes more effort, but it is completely doable and the result is the same.
The dough is ready when it has risen to the top of the loaf pans with a slight dome above the rim. Press one finger about half an inch into the dough. If the indent springs back slowly but does not fully fill in, the loaves are properly proofed.
If it springs back immediately, give them another 10 minutes. That finger test works for every yeast bread you will ever make.
Absolutely! A standard 9x5 inch aluminum pan 🛒 works fine. Grease it thoroughly with butter. The crust may be slightly paler than it would be in cast iron, but the crumb and swirl will be identical.
If the bottom is browning faster than the top, slide a second baking sheet underneath the pan to buffer the heat.
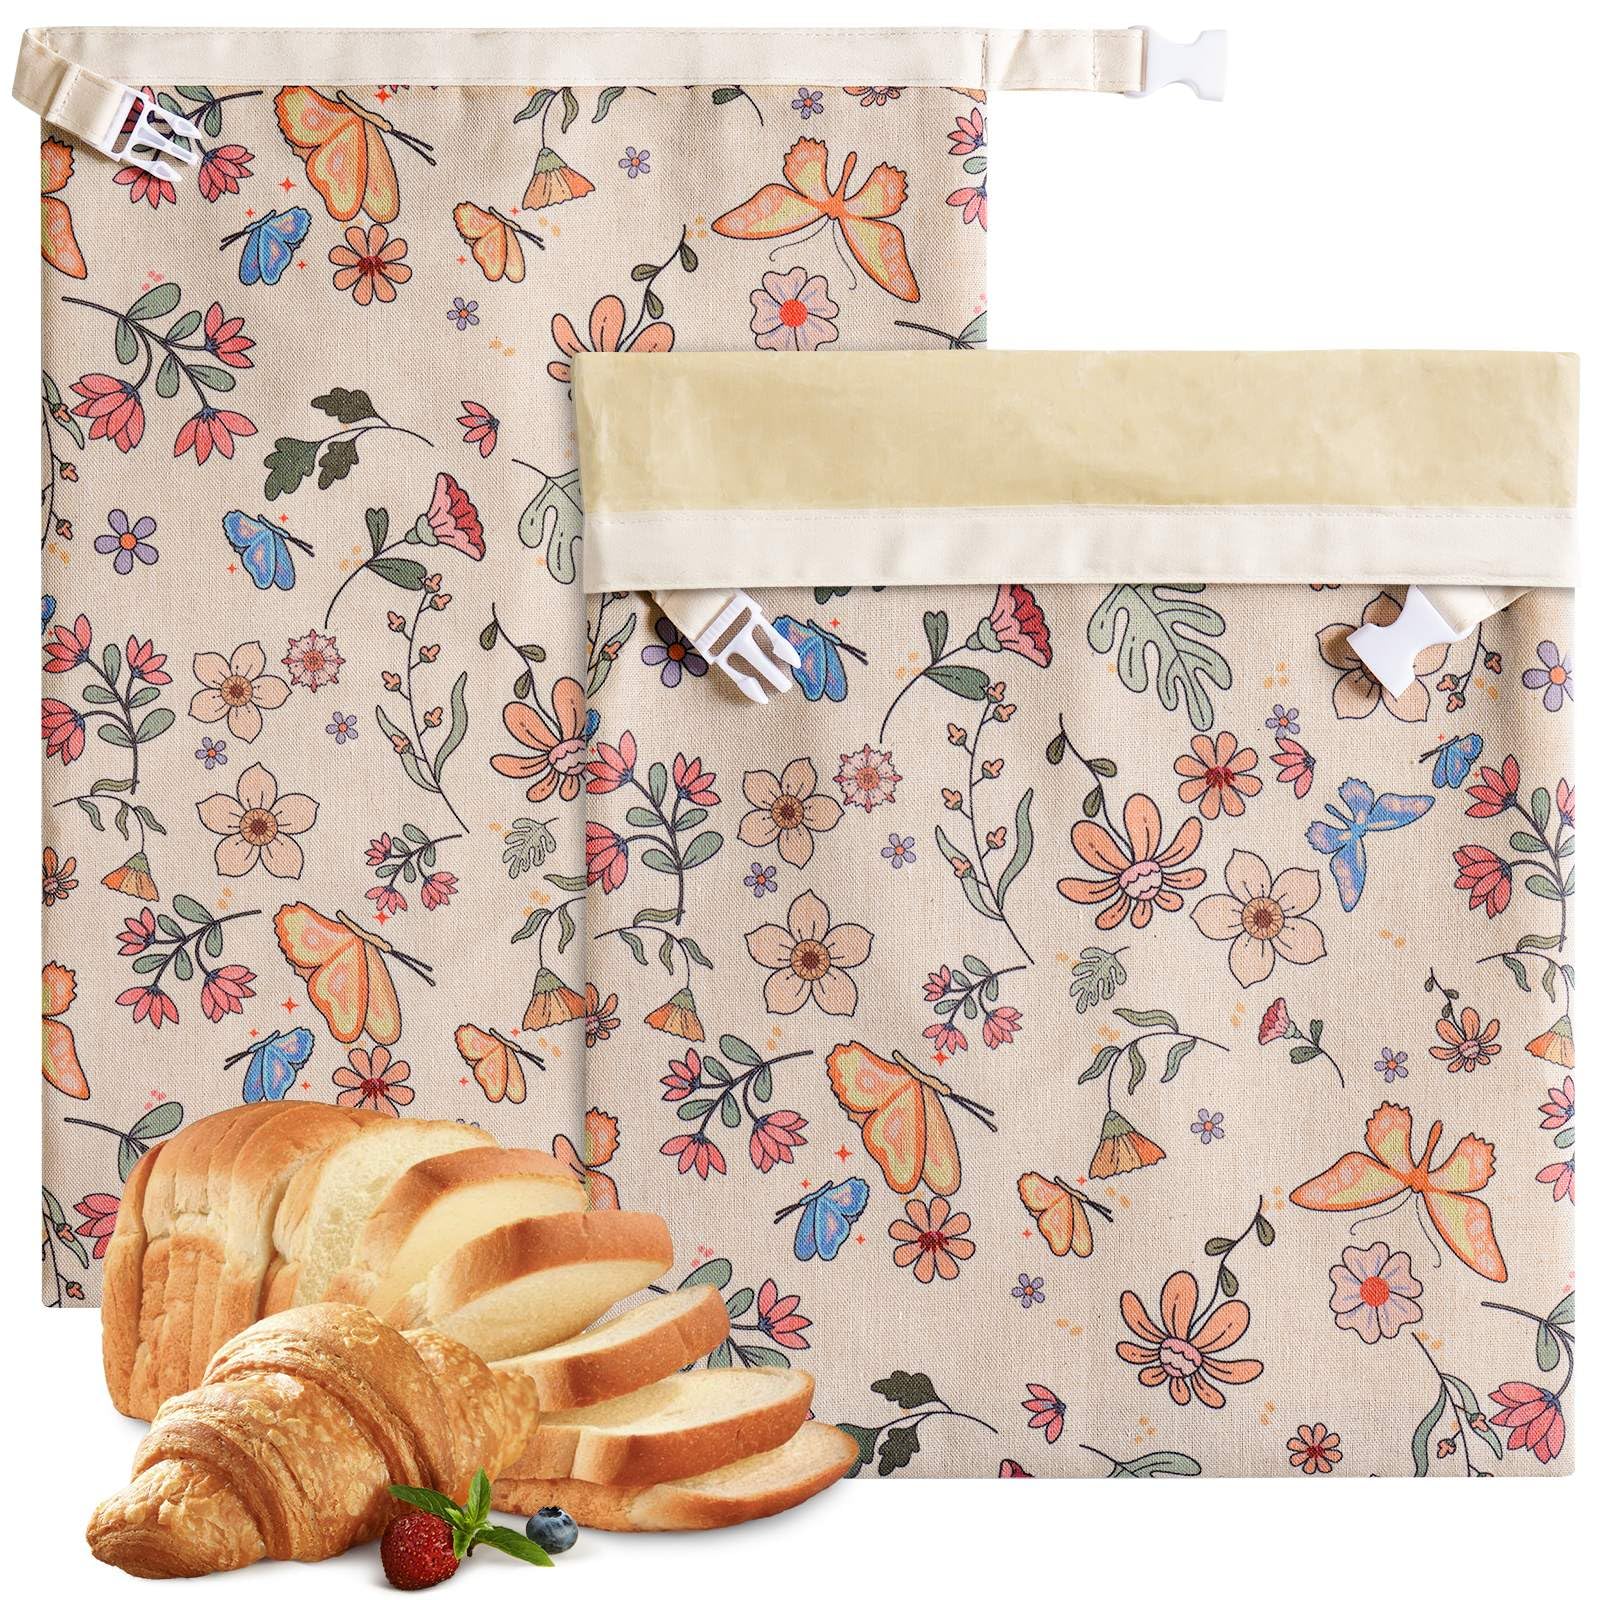
Skip the plastic wrap and skip the refrigerator. Plastic traps moisture against the crust and makes it soggy, while cold air draws moisture out of the crumb and stales a yeast bread noticeably within 24 hours.
The best option for keeping homemade cinnamon swirl bread fresh and moist for days is a beeswax canvas bread bag 🛒. These bags allow just enough airflow to keep the crust from going soft while holding enough moisture to keep the crumb from drying out.
Store the bagged loaf at room temperature on the counter and it will stay in good shape for up to 3 days without any of the tradeoffs that come with plastic or foil.
Two Loaves In, One Skill Set You Keep
Once homemade cinnamon swirl bread is in your regular rotation, the store-bought version becomes hard to justify on any practical level. You know what went into it, you know what properly proofed dough looks and feels like, and you have a second loaf in the freezer for the next day.
The skills you built here, enriched yeast dough, steam proofing, and a clean rolled swirl, carry directly into cinnamon rolls, dinner rolls, and every other soft yeast dough recipe you make from this point forward. That knowledge does not expire and it does not come in a bread bag.
If this cinnamon swirl bread gave you confidence with enriched yeast dough, that confidence transfers directly to the next challenge.
Pecan sticky buns use the same yeast dough fundamentals with a brown sugar caramel pecan base that bakes into the bottom of the pan and inverts onto the serving platter.
Traditional conchas take that same enriched dough in a completely different direction, building on a Mexican bakery tradition that goes back generations, with a hand-scored sugar paste topping that is more straightforward than it looks. Both are worth making once you know your dough!
If this was your first time working with yeast dough or you have a variation that works well in your kitchen, leave a comment below. Real feedback from real bakers is what keeps a recipe honest and worth coming back to.

0 comments