These easy homemade caramel apples create perfect autumn treats using only pantry staples and a simple melting method that delivers bakery-quality results in just 20 minutes. The 1968 technique produces a smooth, buttery caramel coating that stays perfectly chewy without becoming hard or brittle. It creates the most consistently delicious caramel apples with that nostalgic county fair flavor we all remember.
The sweet aroma of melting caramel mingles with crisp autumn apples, filling your kitchen with the unmistakable scent of fall festivals and childhood memories. Each bite delivers that perfect balance of tart Granny Smith apple against rich, golden caramel.
Life in the 1968 Kitchen
Step into 1968, when avocado-green refrigerators hummed beside harvest-gold stoves and The Andy Williams Show played softly from living rooms still glowing with wood-paneled warmth. Mothers stood at kitchen windows watching October leaves drift past while stirring caramel in double boilers, their children already home from school and eager to help press wooden sticks into waiting apples.
This was the era of convenience meets tradition. Kraft had revolutionized home candy-making by printing caramel apple recipes directly on their caramel packages, turning what once required candy thermometers and precise temperatures into a simple family activity. The double-boiler method eliminated guesswork, while wooden skewers replaced fancy candy-making tools.
County fairs and Halloween celebrations were simpler affairs in 1968. Children carved jack-o'-lanterns by candlelight while parents prepared homemade treats for trick-or-treaters. Making caramel apples became a beloved October tradition, marking the transition from summer's end to autumn's cozy embrace.
What Makes These Homemade Caramel Apples Great
Easy Homemade Caramel Apples Recipe
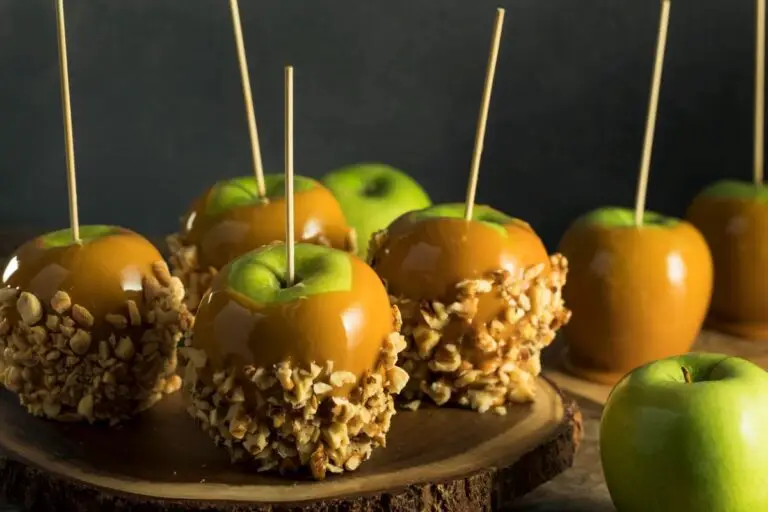
This vintage 1968 recipe transforms crisp apples into glossy autumn treats with melted Kraft caramels and a crunchy walnut coating. Simple enough for an afternoon project with sticky-fingered helpers, these homemade caramel apples deliver that perfect balance of tart and sweet that’s been making fall memorable for generations.
- Total Time: 40 minutes
- Yield: 6 1x
Ingredients
- 1 pound (about 56) Kraft caramels
- 2 tablespoons water
- 6 medium-sized Granny Smith apples
- Chopped Walnuts
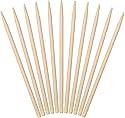
- 6 wooden skewers or popcicle sticks
Instructions
- Place the caramels and water in a double boiler over simmering water. Melt slowly, stirring occasionally, until the mixture becomes smooth and silky.
- Insert a wooden skewer firmly into the stem end of each apple, pushing it about halfway through.
- Dip each apple into the warm caramel, turning slowly to coat completely. Allow any excess caramel to drip back into the pot.
- If the caramel begins to thicken and becomes difficult to spread, stir in a few drops of water to thin it back to dipping consistency.
- While the caramel is still warm and tacky, roll the bottom half of each apple in the chopped walnuts, pressing gently so they adhere.
- Place the finished apples on a cookie sheet lined with waxed paper, leaving space between each one. Refrigerate until the caramel coating sets and becomes firm, about 30 minutes.


How to Make Perfect Homemade Caramel Apples
Recipe Variations, Serving Ideas, and Storage
Recipe Variations
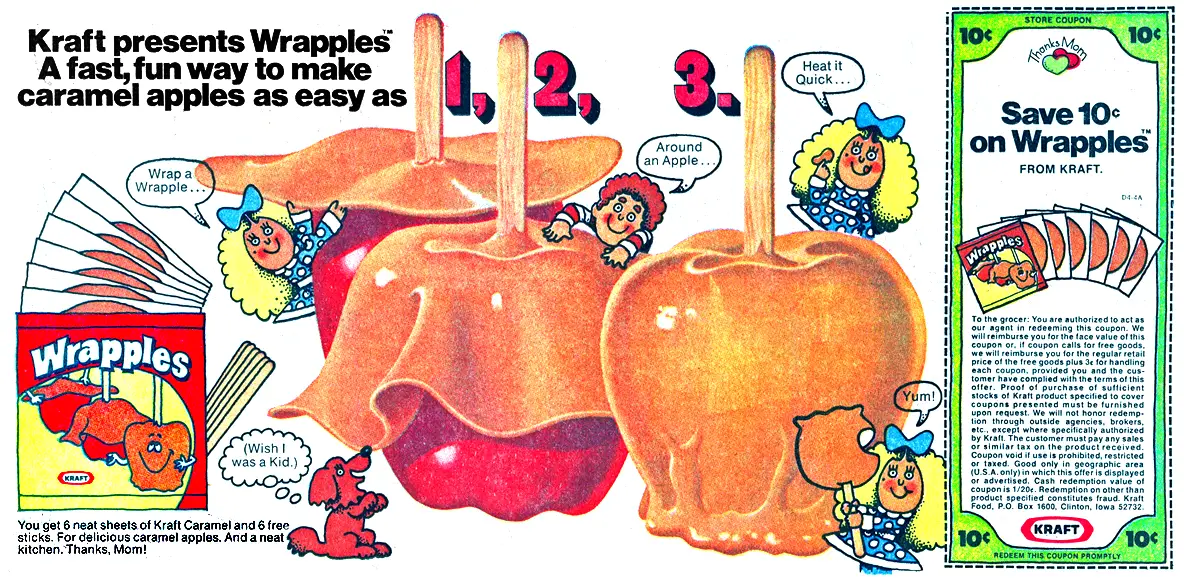
Wrapples: The Game-Changing 1974 Innovation
The 1968 recipe calls for melting individual caramels in a double boiler, but in 1974 Kraft Foods introduced an innovation that revolutionized home caramel apple-making. Wrapples transformed the process from a 20-minute stovetop endeavor into a 5-minute oven activity that even young children could safely help with.
These ingenious caramel sheets eliminated the sticky mess of melted caramel while delivering the same delicious results. Home cooks simply wrapped the flexible caramel around fresh apples, inserted popsicle sticks, and warmed them briefly in a 200°F oven. The sheets melted evenly around the fruit, creating a smooth, professional-looking coating without any dipping or dripping.
Wrapples became synonymous with Halloween traditions throughout the late 1970s and into the 1980s, offering busy families a way to create homemade treats without the complexity of traditional caramel making. The product created a slightly firmer caramel coating that traveled well and stayed fresh longer than melted caramel versions.
How To Use Wrapples
1.
Preheat your oven to a low temperature, around 200°F.
Wash and thoroughly dry your apples. Any moisture can prevent the caramel from sticking.
2.
Place an apple in the center of a caramel sheet. Press the caramel wrap over the top and stretch it down and around the sides of the apple, covering it completely. Insert a stick into the top of each apple.
3.
Place the apples on a baking sheet lined with parchment paper.
4.
Heat in the oven for about 5 minutes, or just until the caramel melts and forms a smooth coating. Let them cool and set before enjoying!
The Raggedy Ann Connection
The 1977 Wrapples commercial featuring clown characters might seem strange by today's standards, but it perfectly captured the cultural moment. That same year, "Raggedy Ann & Andy: A Musical Adventure" hit theaters, riding the wave of America's handmade craft revival that defined the entire decade.
The 1970s celebrated everything homespun and authentic. Macramé plant hangers adorned kitchen windows, tie-dye shirts filled closets, and DIY projects connected families to something more meaningful than mass-produced goods. Raggedy Ann embodied this folk-inspired nostalgia with her yarn hair, button eyes, and handcrafted charm.
During Halloween 1977, countless children across America (including me!) donned red yarn wigs and triangle noses, capturing a moment when something as simple as a rag doll could feel truly magical. Wrapples fit perfectly into this cultural landscape, offering families a way to create "homemade" treats that bridged convenience with tradition.

Frequently Asked Questions
Waxy apple surfaces prevent caramel adhesion. Wash apples thoroughly with hot water and dry completely before inserting sticks. Room temperature apples work better than cold ones.
Yes, but ensure your homemade caramel reaches the soft-ball stage (235°F) and cools to dipping consistency. Add 1-2 tablespoons of water if the caramel becomes too thick.
Hold freshly dipped apples upside down for 10-15 seconds to allow excess caramel to drip off. Use a spatula to scrape the bottom clean before placing on wax paper.
Make caramel apples up to three days ahead for best quality. Store refrigerated and bring to room temperature 15 minutes before serving.
Granny Smith apples provide the ideal tartness and firm texture. Honeycrisp and Braeburn also work well, but avoid soft varieties like Red Delicious.
Overheating causes caramel to separate and become grainy. Use gentle heat in a double boiler and stir only occasionally to prevent this issue.
Roll apples in chopped nuts immediately after dipping while the caramel is still warm and tacky. Press gently to ensure good adhesion without breaking the caramel coating.
Yes, Concord Foods now produces Wrapples caramel apple wraps, available on Amazon and in many grocery stores during the fall season.
What autumn traditions bring back your warmest childhood memories? Did you ever make caramel apples with your family using either the traditional method or those convenient Wrapples sheets? I'd love to hear your stories in the comments below!
If you make these easy homemade caramel apples, please leave a rating and review!
0 comments