1949 Baked Acorn Squash With Butter and Cinnamon

November 11, 2025

This classic baked acorn squash with butter and cinnamon delivers tender, caramelized perfection in just one hour using only six simple pantry ingredients. The steaming method produces a more tender flesh than modern roasting techniques, while the butter-cinnamon filling creates a sweet glaze that pools in the center. 

This vintage recipe is so simple - no fancy equipment needed, just some basic pantry staples and your oven.

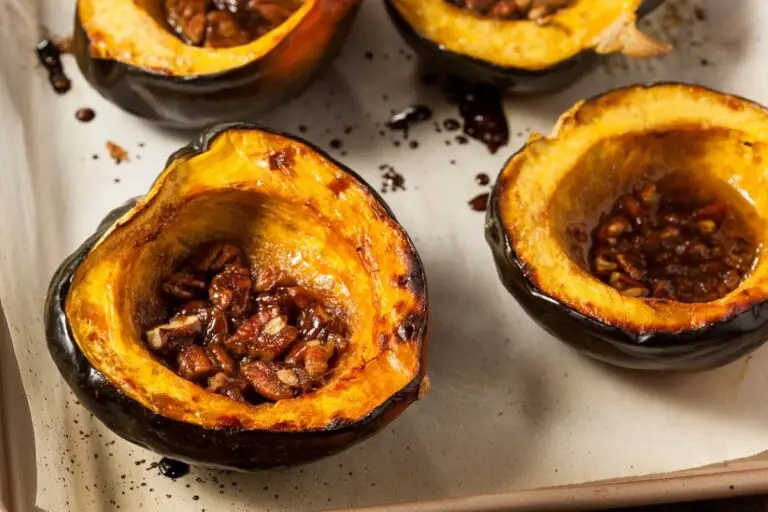
The sweet fragrance of cinnamon and butter fills the kitchen as the squash halves transform from a pale yellow to a deep golden hue. The buttery pool in the center, studded with whole cloves, tastes exactly as autumn should: warm, comforting, and slightly spiced. When you scoop through that tender flesh, each bite carries hints of maple sweetness balanced by a whisper of pepper.

The 1949 Kitchen

In 1949, home cooks were finding their rhythm again after years of wartime rationing. Victory gardens were still flourishing in backyards, and families were eager to celebrate the harvest season with vegetables they'd grown themselves. Winter squash, like acorn, became a staple because it stored nicely in cool cellars for months without refrigeration.

The typical 1949 kitchen featured an electric or gas oven that could hold a steady temperature, a significant upgrade from coal or wood-burning stoves. Radio programs like "The Betty Crocker Cooking School of the Air" shared recipes with millions of housewives tuning in mid-morning. Acorn squash recipes were often shared during these broadcasts because they stretched the food budget while providing hearty, nutritious side dishes for growing families.

Whole cloves appeared frequently in 1940s recipes, adding aromatic warmth to both sweet and savory dishes. These tiny flavor powerhouses were affordable pantry staples that elevated simple vegetables into something special for Sunday suppers and holiday tables.

What Makes This Baked Acorn Squash Recipe Work

  • Steaming Creates Superior Texture
    Baking the squash cut-side down in hot water steams the flesh while it roasts, producing incredibly tender results. This vintage technique keeps the squash moist throughout cooking, preventing the dry, stringy texture that happens when squash halves bake uncovered. The steam penetrates evenly, softening every bit of flesh right up to the skin.
  • Butter and Molasses Deepen Flavor
    Butter provides rich, dairy-forward notes while molasses adds complex sweetness with subtle mineral undertones. Together they create a glaze that's less one-dimensional than modern recipes using only brown sugar or maple syrup. The molasses particularly enhances the squash's natural earthiness.
  • Whole Cloves Add Aromatic Complexity
    Sticking two whole cloves into each squash half infuses the flesh with warm, slightly peppery spice notes. As the squash bakes, the cloves release essential oils that mingle with the butter and molasses, creating layers of flavor. You can easily remove the cloves before serving for those who prefer milder seasoning.
  • Two-Stage Baking Ensures Even Cooking
    Covering the pan for the first 45 minutes traps moisture and heat, steaming the squash evenly. Uncovering for the final 15 minutes allows the edges to caramelize and brown, creating textural contrast between the tender interior and slightly crispy edges. This two-stage method is key to achieving both tenderness and flavor development.
Print
clockclock iconcutlerycutlery iconflagflag iconfolderfolder iconinstagraminstagram iconpinterestpinterest iconfacebookfacebook iconprintprint iconsquaressquares iconheartheart iconheart solidheart solid icon
Baked acorn squash dressed with pecans

Baked Acorn Squash Recipe

5 Stars 4 Stars 3 Stars 2 Stars 1 Star

No reviews

This classic baked acorn squash with butter and cinnamon is a vintage 1949 recipe that produces tender, caramelized squash with a sweet, spiced glaze. Simple pantry ingredients and a unique steaming technique create restaurant-quality results that taste like pure autumn comfort.

  • Total Time: 1 hour 10 minutes
  • Yield: 6 servings 1x

Ingredients

Scale
  • 3 medium acorn squash
  • 3/4 teaspoon salt 3/8 teaspoon black pepper
  • 3/4 teaspoon ground cinnamon
  • 6 whole cloves
  • 6 tablespoons molasses (or substitute maple syrup/brown sugar)
  • 6 tablespoons butter or margarine

Instructions

  1. Prepare oven and pan: Preheat oven to 400°F. Add 2 inches of hot water to a large baking pan.
  2. Prepare squash: Wash acorn squash thoroughly. Cut each squash in half lengthwise using a sharp knife. Scoop out seeds and stringy pulp with a spoon, discarding them.
  3. Season squash: Sprinkle the inside of each squash half with salt, pepper, and cinnamon. Stick 2 whole cloves into the flesh of each half. Add 1 tablespoon molasses and 1 tablespoon butter to the center cavity of each half.
  4. Bake covered: Place squash halves cut-side up in the baking pan with hot water. Cover the entire pan tightly with aluminum foil. Bake for 45 minutes.
  5. Finish uncovered: Remove foil and continue baking uncovered for 15 minutes, or steam on stovetop in covered pan until tender (about 25 additional minutes). The squash should be easily pierced with a fork and the edges should be lightly browned.
  6. Serve: Remove cloves before serving. Serve hot with the melted butter and molasses glaze spooned over each portion.

Nutrition

  • Calories: 185
  • Sugar: 10g
  • Sodium: 355mg
  • Fat: 8g
  • Saturated Fat: 5g
  • Carbohydrates: 32
  • Fiber: 3g
  • Protein: 2
  • Cholesterol: 20mg

How to Make Perfect Baked Acorn Squash

  • Choose Squash with Orange Patches
    Look for acorn squash that shows some orange coloring on the green skin; this indicates ripeness and sweeter flavor. The squash should feel heavy for its size with hard, dull skin and no soft spots. Shiny skin often means it was picked too early, resulting in less sweet flesh.
  • Cut Lengthwise for Stability
    Slicing the squash lengthwise from stem to tip creates stable halves that sit flat in the baking pan. Use your strongest, sharpest chef's knife and pierce the center first before cutting through each end. This method is safer than trying to cut through the hard stem end first.
  • Don't Skip the Hot Water
    Adding hot water to the pan before baking is critical—it creates the steam environment that makes this vintage technique superior to modern dry-roasting methods. The water should come about 2 inches up the sides of the pan to generate adequate steam throughout the covered baking time.
  • Cover Tightly During Initial Baking
    Use heavy-duty aluminum foil and seal it well around the pan edges to trap all the steam inside. Any gaps will allow steam to escape, reducing the tenderizing effect. In the past, I've mistakenly used loose foil and ended up with unevenly cooked squash - tight sealing makes all the difference.
  • Remove Cloves Before Serving
    While the cloves infuse wonderful flavor during baking, they're quite strong if bitten into directly. I've tried leaving them in for presentation, but guests often accidentally bite into them. Simply pluck out the two cloves from each half before bringing the dish to the table.
  • Test Doneness with a Fork
    The squash is ready when a fork pierces the flesh easily all the way through to the skin. Larger squash may need an extra 10-15 minutes of covered baking time. Check early rather than overcooking, as overcooked squash becomes mushy and loses its appealing texture.
  • Recipe Variations

  • Serving Ideas

  • Make Ahead & Storage 

Recipe Variations

  • Maple-Butter Version: Replace molasses with pure maple syrup for a milder sweetness with amber notes. Add a pinch of nutmeg alongside the cinnamon for classic autumn spice flavors.
  • Savory Herb Preparation: Skip the sweet ingredients entirely and fill each half with butter, fresh thyme, rosemary, salt, and cracked black pepper. This pairs beautifully with roasted meats and poultry.
  • Brown Sugar Substitute: Use 1-2 tablespoons brown sugar instead of molasses if you prefer lighter, more caramel-forward sweetness. Pack it into the center cavity with the butter and spices.
  • Honey-Cinnamon Style: Drizzle honey over the butter and cinnamon for floral sweetness. Honey also creates a lovely glaze that caramelizes beautifully during the uncovered baking stage.

Frequently Asked Questions

How long does it take to bake acorn squash at 400 degrees?

Bake acorn squash at 400°F for about 45 minutes covered, then 15 minutes uncovered, for a total of 60 minutes. Larger squash may need an extra 10-15 minutes.

Should I cut acorn squash in half before baking?

Yes, cutting acorn squash in half lengthwise before baking allows you to remove the seeds and creates a cavity for seasonings. It also significantly reduces cooking time compared to baking whole squash.

Do you eat the skin of baked acorn squash?

The skin of acorn squash is technically edible when well-cooked and tender, but most people scoop out only the flesh and leave the skin behind. The skin can be tough and isn't as pleasant to eat.

What temperature should acorn squash be cooked to?

Acorn squash is done when the flesh is easily pierced with a fork all the way through. There's no specific internal temperature to target—tenderness is the best indicator of doneness.

Can you prepare acorn squash ahead of time?

You can cut and seed acorn squash several hours ahead and store the halves covered in the refrigerator. Cooked acorn squash keeps refrigerated for up to 4 days and freezes well for up to 12 months.

Why is my baked acorn squash stringy?

Stringy acorn squash usually means it was overripe when harvested or baked too long at too high a temperature. Choose squash that's heavy for its size with balanced green-and-orange coloring, not predominantly orange.

Can I bake acorn squash without adding water to the pan?

While you can roast acorn squash without water, adding water creates steam that makes the flesh more tender. The vintage steaming method produces better texture than dry roasting alone.

What can I substitute for molasses in baked acorn squash?

Substitute maple syrup, honey, or brown sugar for molasses in equal amounts. Each creates a slightly different flavor profile—maple adds amber notes, honey adds floral sweetness, and brown sugar adds caramel depth.

Can I freeze cooked acorn squash?

Yes, cooked acorn squash freezes beautifully for 10-12 months. Scoop the flesh from the skin, mash it if desired, and store in airtight containers or freezer bags. Thaw in the refrigerator before reheating.

This recipe has earned a permanent spot in my autumn rotation. Do you have a go-to side dish that appears every fall, or are you still searching for the perfect one?

If you make this 1949 Baked Acorn Squash, please leave a rating and review!

About the Author

Melissa is the creator of Recipe Rewind, where she preserves culinary history one vintage recipe at a time. With Wisconsin roots and a passion for desserts, she specializes in reviving original recipes like the 1908 Hydrox cookie - honoring the authentic versions before they're overshadowed by modern imitations. Self-taught from age seven with a Bisquick box and her Mamaw's handwritten recipe cards, her culinary passion has grown through international travel and raising four children. Today, she cooks in a truly multi-generational kitchen spanning five generations - from the Silent Generation to Gen Z - where timeless recipes bridge the decades. Melissa adapts vintage recipes for modern home cooks and bakers, believing food connects us all across generations, cultures, and time.

Leave a Reply

Your email address will not be published. Required fields are marked

Recipe rating 5 Stars 4 Stars 3 Stars 2 Stars 1 Star

{"email":"Email address invalid","url":"Website address invalid","required":"Required field missing"}

More Vintage Recipes Worth Remembering

Traditional German Soft Pretzels with Beer
Authentic American Settlers Prairie Bread
1930 Candied Cranberries Recipe
>