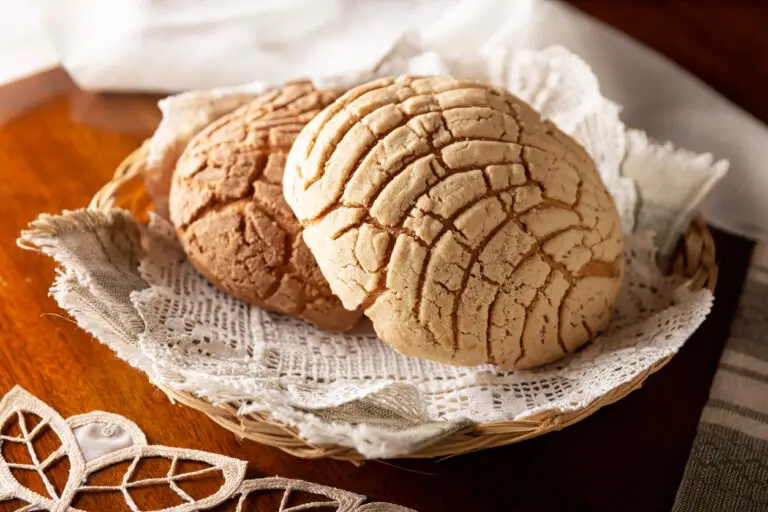
This traditional conchas recipe creates soft Mexican sweet bread with a crunchy vanilla topping that shatters when you bite through to the buttery crumb underneath. The dough takes time to rise, but that's what gives these conchas their bakery-soft texture.
Most homemade conchas recipes skip the second rise or use too much flour, which makes them dense instead of light. This recipe follows the traditional method I learned. The key is keeping the dough soft and sticky, even when it feels like you should add more flour. I made that mistake a couple of times before I decided to trust the process.
These conchas taste exactly like the ones from the panadería on Sunday mornings, when the whole neighborhood smells like butter and vanilla.
What Makes Conchas Special in Mexican Families
Conchas are an edible representation of Sunday mornings at the panadería. My husband grew up with his mom bringing home a bag of fresh conchas after church, the paper already translucent with butter by the time they got home. Everyone in the neighborhood did the same thing, so Sunday afternoons smelled like vanilla and cinnamon up and down the whole street.
My husband told me his abuela used to say you could tell how a panadería treated its customers by how their conchas tasted at 6 a.m. If they were still warm and soft, the baker cared. That tradition of fresh-baked morning bread has connected generations of Mexican families; it's memory and heritage wrapped into something you can hold in your hand.
Now I make this recipe so my son grows up knowing what a Mexican kitchen smelled like on weekends. I want him to associate the scent of vanilla and butter with the family tradition continuing. That's what these are really about.
Other Breads That Carry Cultural Memory
Some breads transcend recipe cards and become markers of identity. You make them because your grandmother did, because your neighbor does, because the absence of that particular smell on a Friday evening or Sunday morning would feel like something essential had gone missing.
Homemade Braided Challah Bread sits center stage at Shabbat tables every Friday, its golden braid glistening under candlelight while voices rise in blessing. The egg-rich dough tears apart in your hands the way it's supposed to, each piece connected to the next like the generations who've been making it for centuries. In Eastern European shtetls, the smell of challah marked the approaching Sabbath as surely as the setting sun, and that same scent still signals the week's work ending and rest arriving. The braiding itself became a meditation, three strands representing unity and family, fingers working through a pattern that doesn't require thinking once you've done it enough times.
Traditional German Soft Pretzels carry their own weight of history, twisted into that distinctive knot that became the official symbol of German bakers' guilds in the year 1111. Walk into any German bakery in the 1950s and 60s, and you'd find pretzels piled high in wicker baskets, their deep brown crusts catching morning light through shop windows. Beer gets kneaded right into the dough, infusing every bite with that subtle malty depth, while the baking soda bath creates the pretzel's signature snap and tang. These showed up at Oktoberfest celebrations, church festivals, and Sunday afternoon gatherings where neighbors shared gossip over coffee and beer, as routine as Americans reaching for chips and dip.
The through-line connecting conchas, challah, and pretzels isn't just technique or ingredients. French bakers arrived in Mexico during the 1860s and transformed local baking; Jewish families carried their Friday bread-making traditions across oceans and borders; German immigrants brought their twisted dough to American beer halls and county fairs. Each bread started somewhere else and became irreplaceable to the communities that adopted it.
What makes them worth the effort - the two rises, the shaping that feels impossible at first, the specific temperatures and timing - is that these breads mark time differently. They signal the end of the work week, the start of a celebration, the arrival of guests who matter. You can't rush them, and that's part of the point.
What Makes This Traditional Conchas Recipe Work
Traditional Conchas Recipe
Soft Mexican sweet bread with a crunchy vanilla sugar topping. This traditional conchas recipe creates bakery-style pan dulce with a tender, buttery crumb and the distinctive shell pattern. Perfect for Sunday breakfast with hot chocolate or coffee.
- Total Time: 3 hours 20 minutes
- Yield: 12 conchas 1x
Ingredients
- 4 cups bread flour, plus extra for kneading
- 1 tablespoon instant yeast
- 3/4 cup warm whole milk (110°F)
- 1/2 cup sugar
- 3 eggs, room temperature
- 8 tablespoons room temperature butter (1 stick)
- 2 tablespoons vanilla extract
- 1 1/2 cups all-purpose flour
- 2 cups powdered sugar
- 1 1/2 cups vegetable shortening
- Red food coloring and cocoa powder (optional)
Instructions
- In a large mixing bowl or stand mixer, slowly incorporate bread flour, yeast, warm milk, and sugar until combined.
- Add room temperature butter one tablespoon at a time, then eggs, then vanilla. Mix until fully incorporated.
- Knead in mixer for 7 minutes on medium speed (or by hand for 15-20 minutes). Add warm milk if dough is too tough. The dough should be soft and slightly sticky but pull away from bowl sides.
- Knead by hand for another 15-20 minutes until elastic and smooth. The dough should pass the windowpane test.
- Place dough in a buttered bowl, cover, and let rest in a warm dark place for 2 hours until doubled in size.
- While dough rises, make the topping: combine all topping ingredients until smooth. Divide topping into 12 equal portions and roll into balls. Set aside.
- Remove air from risen dough and divide into 12 equal pieces. Roll each into a smooth ball.
- Place dough balls on a parchment-lined baking sheet. Lightly grease the top of each ball with butter or shortening.
- Flatten each topping ball between your palms or using plastic wrap (like making tortillas) into a thin disc. Place on top of each dough ball and press gently.
- Use a concha cutter or knife to score the shell pattern designs on each topping.
- Cover and let rest again for 30 minutes in a warm place.
- Preheat oven to 325°F.
- Bake for 18-20 minutes or until bottoms are golden brown. The tops will remain light colored.
- Remove from oven and let cool on a wire rack for at least 15 minutes before serving.
Equipment

KitchenAid 9x13in Nonstick Aluminized Steel Baking Sheet
Buy Now →
Stainless Steel Concha Cutter Made in Mexico
Buy Now →
Cuisinart 5.5 Quart Stand Mixer
Buy Now →Nutrition
- Serving Size: 1 concha
- Calories: 285
- Sugar: 18g
- Sodium: 15mg
- Fat: 13g
- Saturated Fat: 5g
- Carbohydrates: 38g
- Fiber: 1g
- Protein: 5g
- Cholesterol: 55mg
How to Make Perfect Traditional Conchas
Recipe Variations, Serving Ideas, and Storage
Recipe Variations
Frequently Asked Questions
You can, but the texture won't be quite as light and fluffy. Bread flour has more protein, which creates better structure. If you only have all-purpose, the conchas will still work but they'll be slightly denser.
This happens when you forget to grease the tops of the dough balls before adding the topping paste. The light coating of butter or shortening acts like glue, keeping the topping in place as the dough rises and bakes.
It should double in size, which takes about 2 hours in a warm spot. Press your finger gently into the dough. If the indentation stays, it's ready. If it springs back immediately, give it more time.
Yes, you'll just knead by hand for 15-20 minutes instead of 7 minutes in the mixer. The dough should feel elastic and smooth when it's ready, and it should pass the windowpane test.
Active dry yeast works fine, but you need to activate it first in the warm milk for about 5 minutes until it gets foamy. Then proceed with the recipe as written.
Usually this means too much flour was added, the dough wasn't kneaded long enough, or the yeast was old and didn't rise properly. Make sure your yeast is fresh and that you're measuring flour correctly (spooning it into the cup, not scooping).
Traditional conchas are vanilla or chocolate, but you can experiment with cinnamon, almond extract, or even matcha powder. Just replace a tablespoon or two of the topping flour with your flavoring.
They're best the same day, but they'll stay soft for 2-3 days in an airtight container. After that, they start to dry out. Freezing is the best option if you want to keep them longer.
Room temperature, which means soft enough to press your finger into easily but not melted. This usually takes about an hour out of the fridge, or you can cut it into small pieces to speed it up.
Yes, you can make the topping paste and refrigerate it for up to a week. Let it come to room temperature before trying to flatten it onto the dough balls, or it will be too hard to work with.

Does your family have a concha recipe that's been passed down? I'd love to hear how your abuela or suegra makes theirs. If you make this traditional conchas recipe, please leave a rating and review so other readers know how it turned out for you!
0 comments