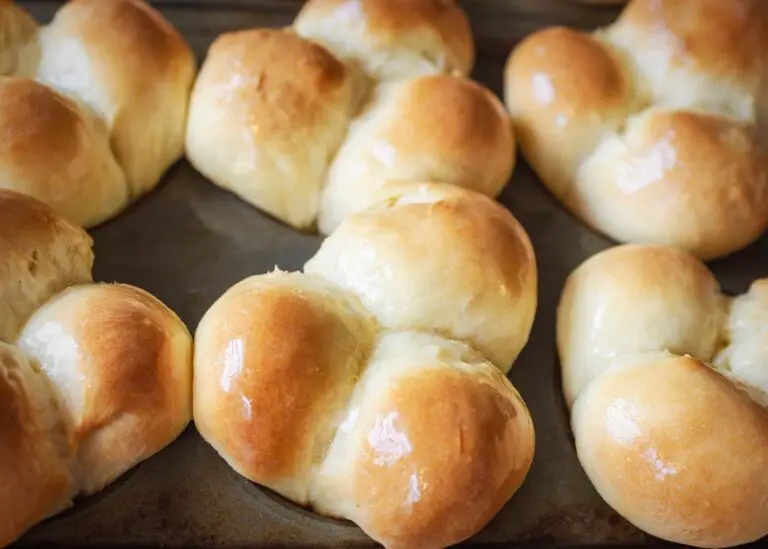
These soft, buttery yeast dinner rolls deliver bakery-quality texture with just six simple ingredients you already have in your pantry. Aunt Irene's vintage recipe yields pillowy-soft rolls with golden crusts that stay tender for days, unlike modern quick-rise methods, which turn stale by morning. These homemade yeast dinner rolls have been a Thanksgiving tradition in my family for as long as I can remember. Passed down from my great-aunt, Irene Robertson, this recipe dates back to about 1948.
The scent of yeast activating in warm milk always takes me straight back to Saturday mornings in my grandmother's kitchen. She'd prop open the oven door just a crack, creating the perfect warm spot for dough to rise while Perry Como crooned from the radio. The house would fill with that unmistakable smell of butter and yeast, signaling something wonderful was about to happen!
The 1948 Kitchen
In 1948, home kitchens were humming with postwar optimism and newfound abundance. After years of rationing butter, sugar, and white flour during World War II, homemakers finally had access to the ingredients that made baking a joy again. The electric refrigerator, still a relatively new appliance in many homes, changed how families stored perishables and gave rise to "icebox" recipes that could be prepared ahead.
Stand mixers were becoming status symbols in American kitchens, though they remained luxury items. KitchenAid had introduced its iconic Model K in 1937, featuring the distinctive silhouette that would become synonymous with the brand, but these machines were expensive investments that many families saved for years to afford. Hamilton Beach and Sunbeam also competed for counter space, their chrome-finished mixers gleaming in kitchens that could justify the $50-60 price tag (equivalent to over $600 today). Most home bakers in 1948 still mixed their dinner rolls by hand, making Aunt Irene's recipe perfectly suited to the wooden spoon and strong arms that were standard kitchen equipment.
Dinner rolls weren't just bread in 1948; they were a symbol of hospitality and pride in homemaking. Women gathered at church suppers and community potlucks, their recipes scribbled on index cards and passed between neighbors over backyard fences. Radio programs like "The Breakfast Club" and "Queen for a Day" filled kitchens with background chatter while dough rose beneath clean dish towels. This was the era when brand loyalty meant something, families swore by their Fleischmann's yeast or their favorite regional flour mill, and recipes specified "one cake yeast" before packets became standard.

1948 KitchenAid
What Makes These 1948 Yeast Dinner Rolls Special
1948 Yeast Dinner Rolls Recipe
This classic 1948 yeast dinner rolls recipe has been passed down through generations as a treasured family tradition. It creates soft, fluffy, golden brown rolls perfect for holiday meals or everyday family dinners. Choose from timeless variations: classic dinner rolls, elegant Parker House rolls with their signature fold, or charming clover leaf rolls that pull apart beautifully. Whichever you pick, these homemade rolls carry the warmth of a simpler time and the comforting taste of homemade bread, ready to fill your kitchen with irresistible aroma and flavor.
- Total Time: about 4 hours
- Yield: about 2 dozen 1x
Ingredients
- 3/4 cup scalded milk
- 4 tablespoons shortening (melted)
- 1 tablespoon sugar
- 2 teaspoons salt
- 1 egg
- 1/2 cup warm water
- 1 teaspoon sugar
- 1 package active yeast (2 1/4 teaspoons)
- 3 1/2 cups all-purpose flour
Instructions
- Wake Up the Yeast: In a small bowl, dissolve the yeast and 1 teaspoon of sugar in the warm water. Let it sit for about 10 minutes until the mixture becomes foamy and bubbly. This is how you know your yeast is active and ready to work its magic.
- Scald the Milk: Gently heat the milk in a small saucepan until small bubbles form around the edge – this is called scalding. Remove from the heat and let it cool until it’s just warm to the touch.
- Combine Wet Ingredients: In a large mixing bowl, pour the cooled milk and add the yeast mixture. Stir in the melted shortening.
- Add Flavor: Stir in the 1 tablespoon of sugar and 2 teaspoons of salt, mixing until well combined.
- Mix the Dough: Add the beaten egg and mix again. Gradually add the flour, about one cup at a time, until a soft dough begins to form and pull away from the sides of the bowl.
- Knead to Perfection: Let the dough rest in the bowl for about 10 minutes. Then, turn it out onto a lightly floured board. Knead for about 15 minutes until the dough is smooth and elastic.
- First Rise: Place the dough into a greased bowl, turning it once to grease the top. Cover the bowl with a warm, damp towel and set it in a warm, draft-free place. Let it rise for 1 to 1 ½ hours, or until it has doubled in size.
- Shape the Rolls: Gently punch down the dough to release the air. On a lightly floured surface, divide the dough into 24 equal pieces. If you find it easier, you can first divide the dough into 6 log-shaped pieces and then cut each log into 4 smaller, equal pieces. A bench scraper or a sharp knife will help you make clean, even cuts.
- Prepare for the Final Rise: Shape each piece into a small ball. Arrange the dough balls in a greased muffin pan for perfectly uniform rolls, or place them snugly together on a baking sheet for pull-apart style rolls.
- Second Rise: Cover the rolls and let them rise one last time in a warm spot for 1 to 2 hours, or until they look puffy and have nearly doubled.
- Bake Until Golden: Preheat your oven to 375°F (190°C). Bake the rolls for 15 minutes, or until the tops are a beautiful golden brown.
- The Finishing Touch: As soon as you take the rolls out of the oven, brush their tops generously with melted butter. This gives them a lovely shine and an extra touch of rich flavor.
Equipment

KitchenAid Classic Series 4.5 Quart Tilt-Head Stand Mixer
Buy Now →
Wilton Gold Non-Stick 12 -Cup Muffin Pan
Buy Now →Nutrition
- Serving Size: 1
- Calories: 105
- Sugar: 0.7g
- Sodium: 201mg
- Fat: 3.8g
- Saturated Fat: 0.9g
- Carbohydrates: 15g
- Fiber: 0.5g
- Protein: 2.6g
- Cholesterol: 10mg
How to Make Perfect 1948 Yeast Dinner Rolls
Recipe Variations, Serving Ideas, & Storage
Recipe Variations
Frequently Asked Questions
Yes, you can substitute instant yeast in equal amounts. Skip the proofing step and mix instant yeast directly with the dry ingredients. The rising time may be slightly shorter, so watch for the dough to double in size rather than timing it exactly.
Dead yeast is the most common culprit. Always proof yeast in lukewarm liquid to verify it's alive before proceeding. Other causes include water that was too hot (which kills yeast), too much salt added directly to yeast, or a kitchen that's too cold for proper fermentation.
Absolutely. Mix ingredients in a large bowl with a wooden spoon, then knead by hand on a floured surface for 8-10 minutes until the dough becomes smooth and elastic. Your arms will get a workout, but the results are identical.
Gently press two fingers into the dough. If the indentation remains and doesn't spring back, it's ready. If the dough springs back immediately, it needs more time. Proper rising creates the air pockets that make rolls light and fluffy.
Yes, fold in up to one cup of shredded cheese, chopped jalapeños, or other mix-ins after the first rise. Avoid adding too many wet ingredients, which can make the dough sticky and difficult to shape. Cheese rolls are particularly delicious with cheddar or Parmesan.
A 9x13-inch metal baking pan works perfectly for 12-15 rolls arranged close together. For crispier individual rolls, use a large rimmed baking sheet with rolls spaced an inch apart. For cloverleaf-shaped rolls, a standard 12-cup muffin tin is essential. Avoid glass pans, which conduct heat differently and may result in pale bottoms.
Move your oven rack to the middle position and make sure your oven is fully preheated. If rolls are still pale after the recommended baking time, brush them with an egg wash (one beaten egg with a tablespoon of water) before baking for deeper golden color.
You likely added too much flour. Measure flour by spooning it into the measuring cup and leveling it off rather than scooping directly from the bag, which compacts flour and adds too much. Dense rolls can also result from insufficient rising time or overworking the dough.
Yes, simply cut all ingredients in half. The baking time and temperature remain the same. A half batch makes 6-8 rolls, perfect for smaller households or when you want fresh rolls without leftovers.
The internal temperature should reach 190°F when measured with an instant-read thermometer inserted into the center of a roll. Visually, they should be golden brown on top and lightly browned on the bottom when you lift one to check.

What's your favorite memory attached to homemade dinner rolls? Was it Sunday supper at your grandmother's table, a holiday meal where the bread basket emptied twice, or your first attempt at baking bread from scratch? I'd love to hear your story in the comments.
If you make these 1948 yeast dinner rolls, please leave a rating and review! Your feedback helps other bakers and lets me know which vintage recipes resonate most with you.
0 comments