Traditional Irish soda bread bakes into a hearty, rustic loaf in under an hour using basic pantry ingredients and a cast iron dutch oven. This wheat germ-enriched version produces a slightly nutty, dense crumb with a crusty exterior without requiring yeast, kneading, or rising time. The entire active prep takes about 10 minutes, making it one of the most practical quick breads you can master.
Baking soda bread in cast iron produces a superior crust compared to thin baking sheets thanks to even heat distribution. The heavy pan radiates heat consistently, giving you that golden-brown exterior and tender interior Irish bakers have perfected for nearly 200 years. I use this same technique for my Old World Dark Pumpernickel Bread to achieve that signature rustic depth. You get authentic results using the same reliable vessel rural Irish families leaned on long before modern ovens were standard.
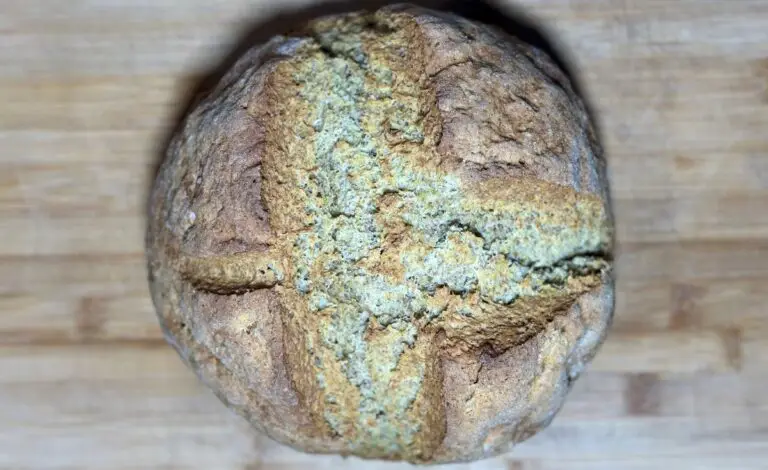
The scored "X" on top isn't just decorative. Irish folklore claims it lets the fairies out, but practically speaking, it allows steam to escape during baking and helps the loaf expand evenly without cracking in random places. Whether you believe in kitchen fairies or basic bread science, cutting that cross into the dough before baking gives you better oven spring and a more attractive finished loaf.
Irish Kitchens in the 1830s
Soda bread emerged in Ireland during the 1830s out of necessity rather than culinary innovation. The country faced specific agricultural and economic challenges that made traditional yeast bread impractical for most families. Irish-grown soft wheat contained insufficient gluten for reliable yeast leavening, and what wheat was produced typically got exported to England by absentee landlords. Ordinary Irish families relied on potatoes and griddled potato breads as dietary staples because they grew well in Irish soil and didn't require expensive imported flour.
When bicarbonate of soda became commercially available in the early 1800s, Irish bakers recognized its potential immediately. The chemical leavener worked reliably with Ireland's low-gluten wheat and required no rising time, no temperature-controlled environment, and no yeast culture maintenance. You mixed four basic ingredients, scored the top, and baked it over a fire or on a griddle. During the Great Famine of the 1840s, when potatoes failed catastrophically, North American ships brought hard wheat and baking soda as famine relief. Irish families rapidly adopted flour-based soda bread because it could be prepared quickly, required minimal fuel, and used ingredients that actually arrived in the country.
The Saleratus to Baking Soda Shift
Early soda bread recipes called for saleratus, a leavening agent made from potassium bicarbonate produced through a laborious process of adding water to wood ash to create lye, then purifying, baking, and fermenting it into a usable powder. By the mid-1830s, commercial manufacturers had started producing a cheaper alternative using sodium bicarbonate instead of the more expensive potassium compound.
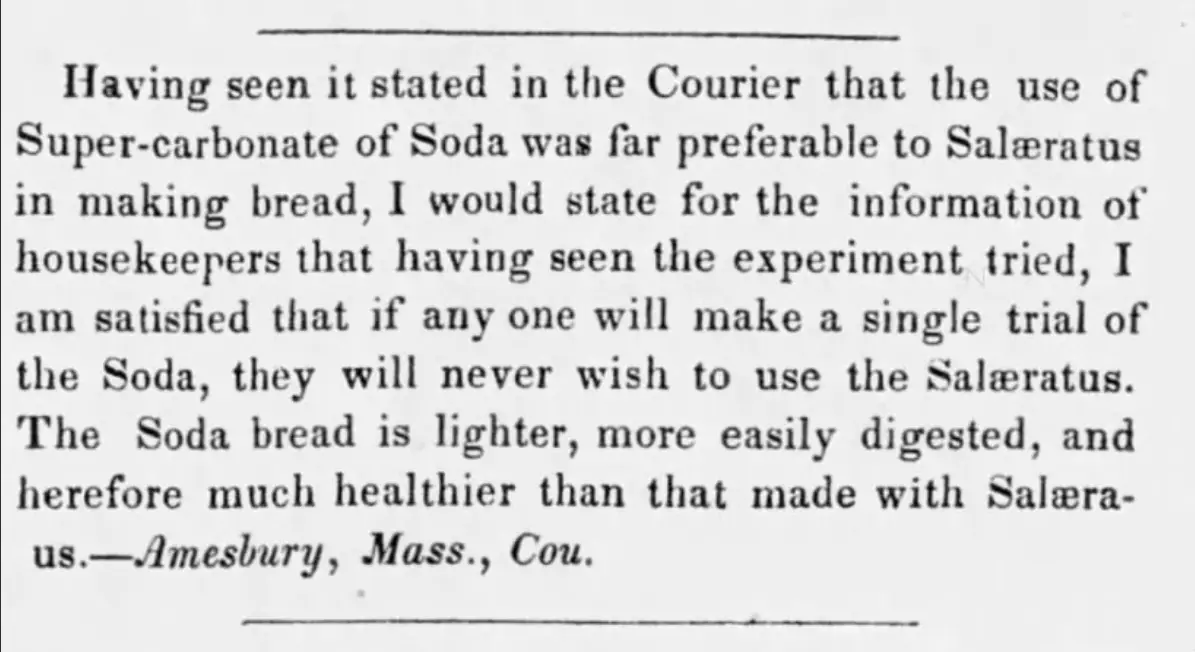
This 1836 letter to the newspaper captures the exact moment when home bakers were testing both products and discovering that "super-carbonate of soda" (sodium bicarbonate) performed better than traditional saleratus, producing lighter, more digestible bread.
The cost difference drove the change. Sodium bicarbonate could be manufactured more efficiently than the old potassium-based saleratus, making it accessible to ordinary families rather than just those who could afford premium ingredients.
By the 1860s, soda bread had become the standard home-baked bread across Ireland. Most families baked it daily in cast iron pots suspended over peat fires or placed directly on the hearth. The technique worked because it demanded almost nothing beyond basic ingredients and a heat source. No special equipment, no lengthy fermentation, no technical bread-making knowledge required. Just mix, shape, score, and bake.
While soda bread was a daily staple, the tradition of using what was on hand extended to other loaves like my Mag Aonghus Traditional Irish Beer Bread. These recipes represent a time when Irish bakers became masters of turning basic staples into warm, crusty centerpieces of the family table.
What Makes This Irish Soda Bread Work
Wheat Germ Adds Nutrition Without Heaviness
Adding half a cup of wheat germ boosts fiber, B vitamins, and gives the bread a subtle nutty flavor without making it dense or heavy. Wheat germ contains the nutrient-rich embryo of the wheat kernel that gets removed during white flour processing. When you add it back into bread dough, you're reintroducing nutritional value that was stripped out, plus adding a slightly toasted grain flavor that complements the tangy buttermilk. The small proportion keeps the texture light while delivering more substance than all-purpose flour alone.
Buttermilk Creates the Acid Reaction
Baking soda requires an acid to activate its leavening properties, and buttermilk provides that acid while adding moisture and a characteristic tangy flavor. When buttermilk's lactic acid contacts the alkaline baking soda, it produces carbon dioxide gas bubbles that make the bread rise. This reaction happens immediately upon mixing, which is why you need to work quickly and get the dough into the oven without delay. Wait too long after mixing, and those gas bubbles escape before the heat can set the structure, leaving you with a flat, dense loaf instead of a properly risen one.
Cast Iron Provides Even Heat Distribution
A cast iron dutch oven (without the lid) heats evenly and retains that heat throughout the baking process, creating consistent crust development. Standard baking sheets reflect heat rather than holding it, which can produce uneven browning and a softer crust. Cast iron absorbs heat, holds it, and radiates it back into the bread from all sides simultaneously. This gives you the golden-brown crust and proper bottom color that defines well-made soda bread. The pan essentially creates a mini-oven environment within your actual oven.
Minimal Mixing Prevents Toughness
Soda bread dough should come together in about 30 seconds of stirring, remaining sticky and barely cohesive. Overmixing develops gluten structure, which makes the bread tough and chewy instead of tender and crumbly. You're not making sandwich bread here that needs gluten strength to hold sandwich fillings. You want a tender crumb that breaks apart easily, which means handling the dough as little as possible. Stir until the ingredients just combine, then stop. The dough won't look smooth or pretty, and that's exactly correct.
Irish Soda Bread Recipe
This traditional Irish soda bread bakes in a cast iron skillet to create a hearty loaf with a nutty flavor from wheat germ and a crusty golden exterior. The recipe requires no yeast, no kneading, and no rising time, making it one of the quickest homemade breads you can prepare. Ready in under an hour from start to finish, this bread delivers authentic Irish texture and flavor using basic pantry ingredients and a straightforward mixing method that even beginners can master successfully.
- Total Time: 50 minutes
- Yield: About 8 slices 1x
Ingredients
- 3 3/4 cups (469g) all-purpose flour, plus extra for dusting
- 1/2 cup (57g) wheat germ
- 2 teaspoons (12g) kosher salt
- 1 tablespoon (12.5g) white sugar
- 2 teaspoons (10g) baking soda
- 1 large egg, beaten
- 1 1/2 cups (360ml) buttermilk
- 2 tablespoons (28g) melted butter, plus extra for greasing
- 2 1/2 cups (313g) all-purpose flour
- 1/2 cup (100g) sourdough discard
- 1 cup (120g) whole wheat flour
- 1/2 cup (57g) wheat germ
- 2 teaspoons (12g) kosher salt
- 1 tablespoon (12.5g) white sugar
- 2 teaspoons (10g) baking soda
- 1 large egg, beaten
- 1 1/3 cups (320ml) buttermilk
- 2 tablespoons (28g) melted butter
Instructions
- Preheat oven to 400°F (204°C). In a large bowl, whisk together flour, wheat germ, salt, sugar, and baking soda until evenly combined.
- In a separate medium bowl, beat egg and buttermilk together. Stir in melted butter until incorporated.
- Pour wet ingredients into dry mixture. Stir with a rubber spatula until just combined, about 30 seconds. The dough will be sticky and shaggy.
- Grease a 9-10 inch cast iron dutch oven thoroughly with softened butter. Set aside.
- Lightly flour your hands and dust the dough ball with flour. Using your hands, gently scrape dough from bowl and shape into a ball with minimal handling.
- Place dough in prepared dutch oven (no lid). Sprinkle top lightly with flour. Using a sharp knife, score a deep X across the top of the loaf, cutting at least ½ inch deep.
- Bake 35-40 minutes, uncovered, until bread is golden brown and sounds hollow when tapped on the bottom. Check at 35 minutes.
- Remove from oven and transfer bread to a cooling rack. Let cool 15 minutes before slicing.
- Serve warm by breaking off pieces and splitting them open. Spread generously with butter.
Equipment
Lodge 5 Quart Cast Iron Dutch Oven With Lid
Buy Now →
Bread Slicer with Stainless Steel Guides
Buy Now →How to Make Perfect Irish Soda Bread
Don't Overmix the Dough
Stop stirring the moment the flour disappears into the wet ingredients. The dough should look shaggy, feel sticky, and appear barely held together. If you keep mixing to achieve a smooth dough, you'll activate too much gluten and end up with bread that has a tough, chewy texture instead of the characteristic tender crumb soda bread should have. I've made the mistake of overmixing early batches, thinking the rough appearance meant it wasn't properly combined. The overmixed loaves came out dense and resilient when they should have been tender and crumbly.
Use a Light Hand When Shaping
Flour your hands lightly and handle the dough just enough to form it into a round ball with minimal kneading. Heavy handling at this stage continues developing gluten, which works against what you're trying to achieve. Scrape the dough out of the bowl, dust it with flour so it's manageable, give it maybe three gentle folds to bring it together, then shape it into a round and place it in your prepared cast iron. Total handling time should be under 30 seconds.
Score Deeply for Proper Expansion
Cut the X into the dough at least half an inch deep using a sharp knife. Shallow scoring looks decorative but doesn't actually allow adequate steam release or expansion. The deep cuts let the bread open up as it bakes, creating natural weak points that control where the crust splits rather than letting it crack randomly. Without proper scoring, internal steam pressure will find the weakest point in your crust and blow it out unpredictably, usually creating an unattractive split along one side.
Check for Doneness with the Tap Test
After 35-40 minutes, remove the bread from the dutch oven and tap the bottom firmly. Properly baked soda bread sounds hollow, like tapping on a wooden door. If it sounds dull or dense, it needs another 5 minutes in the oven. The hollow sound indicates that moisture has evaporated from the interior and the structure has set completely. An instant-read thermometer should register 200-205°F in the center if you want a more precise indicator, but the tap test has worked reliably for generations of Irish bakers who never owned thermometers.
Let It Cool Before Slicing
Wait at least 15 minutes after removing the bread from the oven before cutting into it. The interior structure continues setting during the initial cooling period, and slicing too early releases steam that should stay trapped, making the bread gummy inside. I know waiting is difficult when warm bread smells this good, but cutting into it immediately produces messy, damp slices that compress under the knife. Give it those 15 minutes, and you'll get clean slices with the proper texture.
Recipe Variations, Serving Ideas, and Storage
Recipe Variations
Frequently Asked Questions
Yes, create a buttermilk substitute by adding 2 tablespoons of white vinegar or lemon juice to 1½ cups of regular milk. Let it sit for 10 minutes before using. The acid curdles the milk slightly and provides the acid reaction needed to activate the baking soda.
Overmixing develops too much gluten, or using old baking soda that has lost its leavening power causes dense bread. Mix the dough only until ingredients combine, and check that your baking soda is fresh by testing it in a small amount of vinegar. Fresh baking soda fizzes vigorously immediately.
Yes, use a standard 9-inch round cake pan or place the shaped dough directly on a parchment-lined baking sheet. The bread will bake successfully but won't develop quite as crisp a bottom crust as cast iron produces. Increase baking time by 5 minutes if using a baking sheet.
Yes, the cross-shaped scoring allows steam to escape and controls where the bread expands during baking. Without it, the internal pressure will crack the crust unpredictably, usually creating an unattractive split along one side rather than the traditional symmetrical appearance.
Tap the bottom of the loaf after removing it from the pan. Properly baked bread sounds hollow, like knocking on wood. If it sounds dense or dull, return it to the oven for another 5 minutes. The internal temperature should reach 200-205°F.
Yes, add up to 1 cup of shredded sharp cheddar cheese or ¼ cup of fresh chopped herbs to the dry ingredients. Both additions work well with the base recipe's flavor profile, though they make the bread less traditional and better suited to serving alongside dinner rather than for breakfast.
Using too much flour or overbaking causes excessive dryness. Measure flour by spooning it into measuring cups rather than scooping directly from the bag, which compacts it and adds extra flour. Check for doneness at 35 minutes rather than automatically baking for 40.
Yes, substitute up to half the all-purpose flour with whole wheat flour, but increase the buttermilk by ¼ cup. Whole wheat flour absorbs more liquid than white flour and needs the extra moisture to prevent the bread from becoming too dry and dense.
Soda bread tastes best within 2 days of baking and stays reasonably fresh for 3 days at room temperature when wrapped in a kitchen towel. After that, it's better toasted than served fresh. Freeze it for longer storage if you can't finish it within 3 days.
Traditional Irish soda bread contains only flour, salt, baking soda, and buttermilk. American versions often add sugar, butter, eggs, and dried fruit. This recipe falls between the two styles, including butter and egg for richness while maintaining the straightforward preparation method and hearty texture of authentic Irish bread.
Pin This Irish Soda Bread with Wheat Germ Recipe for Later

Irish soda bread belongs on your table year-round, not just in March when everyone suddenly remembers it exists. The wheat germ adds a subtle nuttiness and nutritional boost that traditional recipes skip, while the cast iron method delivers the crusty exterior and tender crumb you're after without any fussy techniques or specialty equipment.
This bread works because the chemistry is sound - buttermilk's acidity activates the baking soda for rise, wheat germ contributes texture and flavor complexity, and cast iron's heat retention creates the proper crust development you won't get from a standard baking sheet.
The best part? You'll have fresh bread on the table in under an hour, start to finish. No proofing, no kneading, no waiting around for dough to double. Mix, shape, bake, eat. That's the entire process. This is the kind of straightforward, reliable recipe that fits into actual daily life instead of requiring you to clear your schedule and plan three days ahead.
Did You Make This Irish Soda Bread with Wheat Germ?
Loved it? Tap the stars and leave a quick rating so more home bakers can find this recipe. Tell us your twist in the comments below! Did you add orange zest, a handful of raisins, or serve it warm with Irish butter? We'd love to hear how it turned out!
0 comments