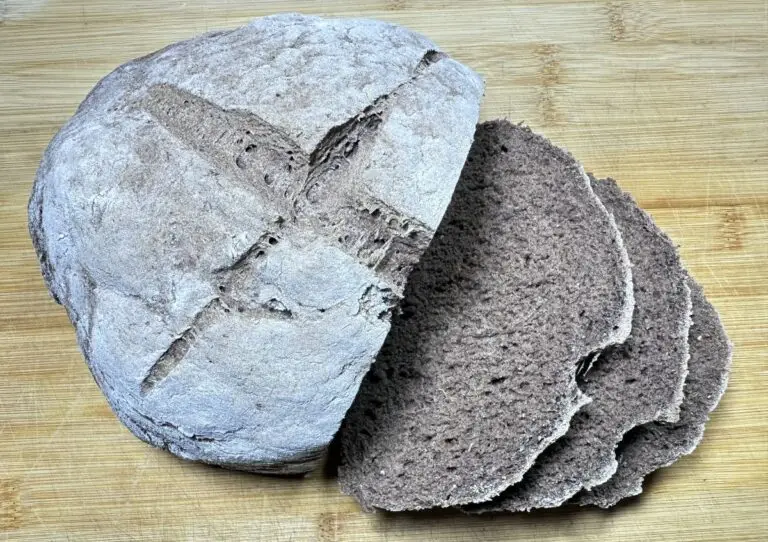
This gluten-free German Bauernbrot recipe creates authentic farmer's bread with a dark, crusty exterior and dense, hearty crumb using buckwheat flour, brown rice flour, and a 24-hour sourdough sponge. The psyllium husk powder binds everything together without eggs or xanthan gum, giving you bread that actually holds its shape when sliced.
I spent 15 years in Germany eating proper Bauernbrot from village bakeries. After moving back to the States, I'd been making traditional wheat-based German breads at home for years when my daughter was diagnosed with Hashimoto's and needed to eliminate gluten. I wasn't about to settle for the tasteless stuff that passes for gluten-free bread in most stores, so I had to reverse-engineer everything I'd learned about German baking to work with gluten-free flours.
This recipe took some testing to get right because gluten-free flours behave completely differently than wheat, but the result is bread that tastes like actual German bread, not like someone's compromise with dietary restrictions.
The whole process takes about 26 hours from start to finish, but your actual hands-on time is maybe 20 minutes. The rest is just waiting for fermentation to do its job. Most gluten-free German bread recipes either skip the traditional sourdough starter entirely or use so many specialty flours you need to special order ingredients from three different suppliers. This version relies on gluten-free flours you can find at any decent grocery store.
If gluten-free yeast dough still feels like a big leap, start with something simpler like these gluten-free banana oat muffins which use the same “hydrate, then bake” principle in a quick-bread format and show you exactly what properly hydrated batter should look like.
Why This Gluten-Free German Bread Works
Psyllium Husk Creates Structure Psyllium husk powder forms a gel when mixed with water, creating the binding structure that gluten normally provides in wheat bread. You need exactly 3 tablespoons for this recipe because that's the ratio that holds the loaf together without making it gummy. The gel forms instantly when you whisk it with water, turning into a thick, transparent mass that looks slightly alarming if you've never worked with psyllium before, but that's exactly what it's supposed to look like. The gel needs 20-30 minutes to fully hydrate, which is why you make it first and let it sit while you measure everything else.
The 24-Hour Sponge Develops Flavor This overnight fermentation with brown rice flour, water, sugar, and a tiny amount of yeast creates the tangy, slightly sour flavor that makes German bread taste like German bread instead of gluten-free cardboard. The long, slow rise breaks down starches and develops complex flavors that quick-rise recipes can't match. This is the same technique German bakers have used for centuries, just adapted for gluten-free flours. Without this fermentation step, you end up with bread that tastes flat and one-dimensional. The sourness is subtle, not aggressive like San Francisco sourdough, but it's what gives the bread depth.
Buckwheat and Brown Rice Provide Density Buckwheat flour gives you that dark, earthy flavor and dense texture that farmer's bread requires. Despite the name, buckwheat is completely gluten-free and actually related to rhubarb, not wheat. It has a strong, distinctive flavor that some people describe as nutty and others find too assertive, but in this recipe, the cocoa powder and seeds balance it out so it doesn't overwhelm everything else. Brown rice flour adds structure without bitterness. It's neutral enough to let the buckwheat and seeds come through, but it contributes body that keeps the bread from falling apart. Together, they create bread that tastes substantial and satisfying, not light and fluffy like sandwich bread. German bread is supposed to be dense. That's not a flaw.
Cocoa Powder Adds Color Without Sweetness One tablespoon of unsweetened cocoa powder darkens the crumb to that deep brown color you see in traditional German bread, and it does it without adding chocolate flavor or sweetness. German rye breads get their dark color from rye malt or long baking at high temperatures. Since we're working with gluten-free flours that behave differently than wheat and can't handle the same extended baking times, the cocoa handles the color while the fennel and caraway maintain the authentic taste. You cannot taste the chocolate. If someone ate this bread without knowing cocoa powder was in it, they wouldn't identify chocolate as a flavor component. It just makes the bread look right.
Fennel and Caraway Are Non-Negotiable These two seeds define German bread flavor. Fennel adds a subtle licorice note. Caraway provides that distinctive sharpness you either love or strongly dislike. You need both, and you need to crush them slightly before adding them to the dough so they release their oils during baking. Skip this step, and you'll have bread with hard seeds that don't contribute much flavor - they'll just be annoying little hard bits you bite into.
This gluten-free German Bauernbrot captures the hearty texture and earthy flavor of traditional farmer’s bread using a 24-hour sourdough starter and a blend of buckwheat, oat, and brown rice flours. Psyllium husk powder replaces gluten for structure, while cocoa powder adds the signature dark color. Caraway and fennel seeds deliver authentic German bread spice notes. The result is a crusty loaf with a dense, substantial crumb perfect for sandwiches or serving with soups.
Total Time:1 day + 90 minutes
Yield:1 loaf 1x
Ingredients
UnitsScale
Sauerteig (Sourdough Bread Sponge)
1/2cup of gluten-free Brown Rice Flour
1/2cup of water
1/4 tsp white granulated sugar
1/4 tsp of active dry yeast
Deutsches Bauernbrot Ingredients:
3/4cup of gluten-free Buckwheat flour
2/3cup of gluten-free Oat flour
1/2cup of gluten-free Brown Rice flour
5 tbsp of potato starch or corn starch
1/2 tbsp of baking powder
1/2 tsp of baking soda
1 1/2 tbsp of apple cider vinegar
1 tsp of kosher salt
1 tbsp of dark, unsweetened cocoa powder
1/2 tsp of crushed fennel seeds
1/2 tsp of crushed caraway seeds
2cups + 2-3 tbsp of water
3 tbsp of Psyllium Husk Powder
Instructions
Sauerteig (Sourdough Bread Sponge):
Mix all of the Sauerteig ingredients together in a small jar, cover with plastic wrap, and let it ferment for a full 24 hours in a warm place.
Baking Instructions:
In a bowl, combine 2 cups of water with the 3 tbsp psyllium husk powder and whisk well. It will gel instantly and become thick. Set aside for 20-30 minutes.
Measure all the dry ingredients and add them to a large bowl. Mix well and preheat the oven to 390°F.
Add the bread sponge, psyllium gel and apple cider vinegar to the bowl and knead the ingredients with a hand or stand mixer (use a dough hook). It will take about 5-10 minutes for the dough to come together.
If the dough appears too dry, add a little more water 1 tbsp at a time. The dough should semi-loose, but not runny like a batter.
Shape the dough into a round or rectangular loaf and place it on a baking sheet lined with parchment paper and a dusting of Oat or Rice flour with the seam-side down. If using a cast iron Dutch oven (uncovered), simply coat it with olive oil (no need to preheat).
With a sharp knife or bread lame, score an “X” across the top of the dough approx. 1/8” deep.
Bake for 50-55 minutes and move to a wire rack; let the bread cool completely before slicing.
Start the Sponge a Full Day Early Mix your sourdough sponge exactly 24 hours before you plan to bake. That half cup of brown rice flour, half cup of water, quarter teaspoon each of sugar and yeast goes into a small jar, gets covered with plastic wrap, and sits in a warm spot on your counter. Room temperature is fine as long as your house is at least 68-70°F. If your kitchen runs cold, put the jar on top of your refrigerator where it's slightly warmer. After 24 hours, it should smell slightly tangy and look bubbly on top. If it doesn't bubble at all, your yeast was dead before you started and you need to start over with fresh yeast. If it smells like nail polish remover or rotten fruit, something contaminated it and you also need to start over. It should smell like bread dough with a vinegar undertone.
Make the Psyllium Gel First Combine 2 cups of water with the 3 tablespoons of psyllium husk powder in a medium bowl and whisk it hard for about 10 seconds. It gels almost immediately and needs to sit for 20-30 minutes to fully hydrate. This gives you time to measure out all your dry ingredients and preheat the oven to 390°F. Don't skip this rest time. The gel needs those 20 minutes to reach the right consistency. When it's ready, the gel will be thick, slightly purple-tinted if you're using whole psyllium husk powder, and have the consistency of hair gel. That's correct.
Mix Dry Ingredients Thoroughly Measure all the flours, starches, baking powder, baking soda, salt, cocoa powder, and crushed seeds into a large bowl and mix them completely before adding any wet ingredients. Gluten-free baking requires more precision than wheat baking because you don't have gluten development to pull everything together and distribute ingredients as you knead. Those dry ingredients need to be evenly distributed from the start, or you'll get pockets of baking soda or cocoa powder that taste wrong.
The Dough Should Be Semi-Loose When you add the bread sponge, psyllium gel, and apple cider vinegar to the dry ingredients and start mixing with your hand mixer or stand mixer fitted with a dough hook, you're looking for dough that holds together but isn't stiff like traditional bread dough. It should be somewhere between bread dough and thick cake batter. Gluten-free dough can't be kneaded the same way wheat dough can, so it starts out wetter. If your dough is too dry and crumbly, add water one tablespoon at a time until it comes together. If it's so wet it's basically batter, you either used too much water or your psyllium husk powder is old and didn't gel properly. The dough needs to be loose enough to shape with your hands but firm enough to hold that shape when you put it on the baking sheet.
Shape Quickly and Score Deeply Form your loaf into a round or rectangular shape and get it onto your parchment-lined baking sheet or into your oiled Dutch oven immediately. Gluten-free dough doesn't improve with resting time before baking. It's ready to go in the oven as soon as you shape it. Score an X across the top about 1/8 inch deep with a sharp knife or bread lame. That score lets steam escape during baking and gives you the traditional German bread appearance with the corners of the X pulling apart. If you don't score it, the bread will crack randomly on the sides, which still tastes fine but doesn't look as intentional.
Bake Hot and Long At 390°F for 50-55 minutes, this bread develops a thick, dark crust that protects the interior and adds flavor. The crust will be hard when it comes out of the oven, then soften slightly as it cools. Don't pull it early because you think the crust is getting too dark. German bread is supposed to have a dark, substantial crust. An instant-read thermometer inserted into the center should read at least 205°F. Gluten-free breads need higher internal temperatures than wheat breads to fully set the structure. Let it cool completely on a wire rack before slicing. This takes at least 2 hours. If you cut into it while it's still warm, the interior will be gummy because the starches haven't fully set yet. I know it's tempting to slice into warm bread, but you'll ruin the texture if you do.
Recipe Variations, Serving Ideas, and Storage
Recipe Variations
Serving Ideas
Make Ahead & Storage
Recipe Variations
You can substitute the potato starch with equal amounts of tapioca starch or arrowroot powder without changing the texture significantly. I tested all three and found potato starch gave the best crumb, but the others work fine if that's what you have.
Add 2 tablespoons of flax meal or chia seeds to the dry ingredients for extra nutrition and a slightly nuttier flavor. This makes the bread even denser, which some people prefer.
For a lighter-colored loaf, reduce or eliminate the cocoa powder. The bread will taste the same but won't have that dark German bread appearance. I tested this when my daughter wanted a milder-looking bread for sandwiches.
Replace the brown rice flour in the main dough with sorghum flour for a slightly sweeter flavor profile. Sorghum works particularly well if you're not a fan of buckwheat's earthiness.
Make this into rolls instead of a loaf by dividing the dough into 12 equal portions after mixing. Shape each into a ball, score the tops, and bake for 25-30 minutes at the same temperature.
Serving Ideas
Slice this bread thick (about ¾ inch) and serve it German-style with cold butter, sliced radishes, and coarse salt for breakfast. Germans call this "Butterbrot" and eat it alongside soft-boiled eggs.
This bread was designed for open-faced sandwiches. Top each slice with cream cheese, smoked salmon, capers, and fresh dill for a quick lunch that actually fills you up.
Toast slices and serve alongside hearty soups and stews. The dense texture holds up to dunking without falling apart the way softer breads do.
Spread with liverwurst or braunschweiger and top with thinly sliced onions and pickles for an authentic German snack that pairs perfectly with a cold beer.
Cut day-old bread into cubes, toss with olive oil and garlic, and bake at 375°F for 15 minutes to make gluten-free croutons that don't disintegrate in salad.
Make Ahead & Storage Instructions
Store completely cooled bread at room temperature wrapped tightly in plastic wrap or in a bread bag for 3-4 days. The thick crust protects the interior from drying out, and the bread actually tastes better on day two after the flavors have developed.
Refrigerate wrapped bread for up to 7 days. The cold slows down any mold development, though it will firm up the texture slightly. Toast refrigerated slices to restore the original texture.
Freeze individual slices separated by parchment paper, then store in a freezer bag for up to 3 months. Pull out slices as needed and toast them straight from frozen. This is the best method if you're cooking for one or two people and can't finish a whole loaf quickly.
For longer storage, freeze the whole loaf wrapped in plastic wrap and then aluminum foil for up to 4 months. Thaw overnight at room temperature before slicing.
Frequently Asked Questions
Can I make this bread without the 24-hour sourdough sponge?
You can skip the sponge and just add all the ingredients together, but you'll lose that tangy, complex flavor that makes German bread taste authentic. The long fermentation is what differentiates this from regular gluten-free bread. If you're in a rush, add 1 tablespoon of apple cider vinegar or lemon juice to the dough for a bit of tang.
What can I substitute for psyllium husk powder?
Nothing works as well as psyllium husk for creating structure in gluten-free bread. Xanthan gum makes the texture gummy, and ground flaxseed doesn't provide enough binding power. If you absolutely must substitute, try 2 tablespoons of ground chia seeds plus 1 tablespoon of xanthan gum, but I tested this and the results weren't as good.
Why is my bread gummy in the middle?
The bread wasn't baked long enough or didn't cool completely before slicing. Gluten-free breads need the full baking time to set properly, and cutting into them while still warm releases steam that makes the crumb gummy. Let it cool for at least 2 hours.
Can I use a bread machine for this recipe?
The psyllium gel needs to be made separately and rest for 20 minutes, which doesn't work with standard bread machine timing. You could mix the dough in a bread machine on the dough setting, then shape and bake it in the oven, but it's honestly easier to just use a hand mixer.
Do I need to use certified gluten-free oats?
If you have celiac disease or severe gluten sensitivity, absolutely yes. Regular oats are often contaminated with wheat during processing. For Hashimoto's or mild gluten sensitivity, regular oat flour usually works fine, but check with your doctor.
Can I make this bread without oat flour?
Replace the oat flour with equal amounts of additional brown rice flour or sorghum flour. I tested this version and it works, though the texture is slightly denser. Oat flour adds a subtle sweetness and softer crumb.
Why do I need to crush the fennel and caraway seeds?
Crushing the seeds releases their essential oils, which distribute flavor throughout the bread instead of just giving you occasional bites with intense seed flavor. Use a mortar and pestle, spice grinder, or put them in a plastic bag and crush with a rolling pin.
How do I know when the bread is fully baked?
The loaf should be deep brown, sound hollow when you tap the bottom, and register at least 205°F on an instant-read thermometer inserted into the center. Gluten-free breads need higher internal temperatures than wheat breads to fully set.
Can I double this recipe?
Yes, but you'll need to bake two separate loaves. The dough doesn't rise like traditional bread dough, so making one giant loaf won't bake evenly. Double all ingredients and divide the dough between two loaf pans or baking sheets.
Why does my bread crack on the sides instead of along the score marks?
The oven temperature was too high, or the score marks weren't deep enough. Make sure your oven is accurately calibrated to 390°F and cut the X at least ⅛ inch deep before baking.
This gluten-free German Bauernbrot proves you don't need wheat to make authentic European bread. After testing different flour combinations and ratios to get bread my daughter could actually eat without feeling like she was settling for a inferior substitute, this version finally tastes like the real thing. The 24-hour fermentation and combination of buckwheat and brown rice flours create bread that tastes like it came from a German village bakery, not from someone trying to work around dietary restrictions.
If you're dealing with Hashimoto's, celiac disease, or gluten sensitivity, what's the one bread you miss most? What would you want to see converted to a legitimate gluten-free version that doesn't taste like cardboard?
If you make this gluten-free German Bauernbrot, please leave a rating and review so other people dealing with gluten issues know whether it's worth the 24-hour wait.
Sully is a contributor to Recipe Rewind, sharing his expertise in traditional bread-making. His 15 years living in Germany sparked a passion for authentic European breads and time-honored baking methods. Sully specializes in recreating traditional old-world breads and other vintage baked goods, adapting forgotten recipes for modern home bakers using techniques and equipment available in today's kitchens. He believes food connects us all across cultures and generations, and is dedicated to preserving culinary traditions through tested, reliable recipes.


0 comments