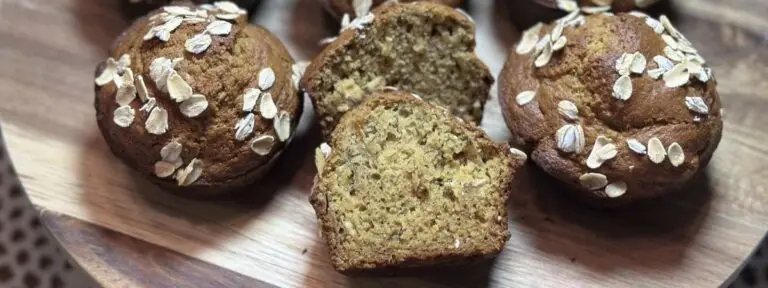
These gluten-free banana oat muffins bake up beautifully moist with tall, domed tops using oat flour and rolled oats for structure without the intimidation factor of typical gluten-free baking. After adapting this recipe for my Hashimoto's dietary needs, I've made these banana oat muffins many times - they are so good! The sweet banana flavor combines with naturally nutty oat flour to create muffins so tender, no one will guess they're gluten-free.
I know gluten-free baking feels overwhelming. The batter never looks right, the texture can turn gummy or dense, and you're never quite sure if things will actually rise. Living with Hashimoto's means I've had to modify every vintage quick bread recipe I love, and I've learned that gluten-free dough and batter behave completely differently than what you expect. But here's what I've figured out through a lot of trial and error: giving your batter time to hydrate before baking is the secret that changes everything.
Why I Created This Gluten-Free Version
When I started adapting vintage recipes for my dietary restrictions, I was terrified of ruining the simplicity that made them special. Quick breads like banana muffins were supposed to be easy, the kind of recipe you could mix up without thinking twice. But gluten-free? That felt like an entirely different language.
I realize "gluten-free" isn't what you picture when you think of vintage baking, but I know I'm not alone in needing recipes that taste good and actually work. These muffins came from my need to create something that honors the straightforward approach of mid-century home baking while working within the limits of a gluten-free kitchen. This particular batch taught me something crucial about letting batter rest and watching for bubbles that signal your leavening agents are working.
Gluten-Free Baking in the Modern Kitchen
Vintage quick bread recipes came from a time when flour was just flour, and you didn't worry about how the proteins would behave in your batter. Home bakers in the 1950s and 60s measured ingredients, mixed them together, and got reliable results every single time. There was a simplicity to it that feels almost impossible now when you're navigating dietary restrictions.
When I started creating gluten-free versions of classic recipes, I had to relearn everything. The tactile cues I'd relied on (how dough should feel, how batter should look) no longer applied. Gluten-free batters look thinner and wetter than their traditional counterparts. They don't hold together the same way, and you can't judge doneness by the same standards. It was frustrating at first, feeling like I'd lost that intuitive knowledge that makes baking feel natural.
But adapting vintage recipes for gluten-free baking taught me something important about why those old recipes worked so well. They were designed for home cooks with basic equipment and ingredients. They didn't require specialized knowledge or professional technique. Once I figured out the science behind gluten-free baking - the need for hydration time, the importance of chemical leaveners, the way oat flour behaves —these recipes became approachable again.
What Makes These Gluten-Free Banana Oat Muffins Work
Gluten-Free Banana Oat Muffin Recipe
Tender, moist gluten-free banana oat muffins made with oat flour and rolled oats that rise beautifully every time. This easy recipe uses simple pantry ingredients and a crucial batter hydration step to create perfectly domed muffins with a soft crumb. Naturally sweetened with bananas and lightly spiced, these muffins taste amazing whether you follow a gluten-free diet or not.
- Total Time: 50 minutes
- Yield: 12 Muffins 1x
Ingredients
- 2 cups gluten-free oat flour
- 1/2 cup gluten-free rolled oats
- 2 teaspoons baking powder
- 1 teaspoon baking soda
- 1/2 teaspoon kosher salt
- 1/3 cup minced walnuts (optional)
- 3 medium bananas, very ripe (smashed and mashed)
- 1/4 cup granulated white sugar
- 1/4 cup packed dark brown sugar (or light brown sugar plus 1 teaspoon molasses)
- 1/2 cup milk (any kind)
- 1/4 cup olive oil (or neutral oil)
- 2 large eggs
- 1 1/2 teaspoons pure vanilla extract
- Extra rolled oats for sprinkling
Instructions
- Prepare dry ingredients: In your stand mixer bowl (or a medium bowl), combine oat flour, rolled oats, baking powder, baking soda, and salt. Whisk together and set aside.
- Mix wet ingredients: In a large Pyrex measuring cup or separate bowl, add the mashed bananas, granulated sugar, brown sugar, milk, olive oil, eggs, and vanilla extract. Use a fork to thoroughly mash and mix everything together until well combined.
- Combine and hydrate: Pour the wet mixture into the bowl with dry ingredients. Mix gently until just combined, being careful not to overmix. The batter will look like thick soup, which is exactly right for gluten-free muffins. Let the batter rest for 20 minutes at room temperature to allow the oat flour to fully hydrate.
- Preheat oven: After the batter has rested for 15 minutes, preheat your oven to 400°F. Line a 12-cup muffin tin with paper liners.
- Fill muffin cups: After the full 20-minute rest (you should see small bubbles forming on the surface), scoop batter into prepared muffin cups, filling each about ¾ full. Sprinkle a little extra oats on top of each filled cup for aesthetics.
- Bake: Bake for 18-20 minutes, or until a toothpick inserted in the center comes out clean and the tops are golden brown and spring back when lightly touched.
- Cool: Let muffins cool in the pan for 2-3 minutes, then transfer to a wire rack to finish cooling completely.
Equipment

Anthony’s Organic Whole Grain Oat Flour, 4 lb, Gluten Free
Buy Now →
Wilton Gold Non-Stick 12 -Cup Muffin Pan
Buy Now →
Pyrex 4-Cup Glass Measuring Cup
Buy Now →Nutrition
- Serving Size: 1 Muffin
- Calories: 211
- Sugar: 12.9g
- Fat: 7.8g
- Carbohydrates: 31.3g
- Fiber: 2.4g
- Protein: 5.2g
How to Make Perfect Gluten-Free Banana Oat Muffins Every Time
Recipe Variations, Serving Ideas, and Storage
Recipe Variations
Frequently Asked Questions
Yes, these muffins work beautifully with any non-dairy milk like almond milk, oat milk, soy milk, or coconut milk. The recipe already uses oil instead of butter, so swapping the milk for a dairy-free alternative is the only change you need to make.
Gluten-free flours, especially oat flour, absorb liquid much more slowly than wheat flour. If you bake the batter immediately after mixing, the oat flour won't have absorbed enough moisture, and you'll end up with dense, gummy muffins. During that 20-minute rest, the flour particles swell as they absorb liquid, which creates the structure your muffins need to rise properly in the oven.
I haven't tested this recipe with other gluten-free flour blends, so I can't guarantee the same results. Oat flour has unique properties that work specifically well in this recipe, including natural sweetness and the ability to create tender texture without grittiness. If you do experiment with other flours, look for a blend that contains xanthan gum, which helps provide structure.
After mixing, the batter will look very thin, almost like thick soup. During the 20-minute rest, it will thicken slightly, and you should start seeing small bubbles forming on the surface. Those bubbles indicate that the baking powder and baking soda are activated and creating carbon dioxide, which is what makes your muffins rise in the oven.
The bananas provide some natural sweetness, but the granulated and brown sugar contribute to more than just flavor. Sugar helps retain moisture in baked goods and contributes to browning and texture. You could reduce the sugar by up to ¼ cup total, but the muffins won't be quite as moist and might not brown as nicely.
The most common reason for dense, flat gluten-free muffins is not allowing the batter to hydrate long enough before baking. Make sure you're giving it the full 20 minutes and looking for those surface bubbles that indicate the leavening is working. Other possible causes include using old baking powder or baking soda that's lost its effectiveness, or overmixing the batter.
Yes, this batter works well for mini muffins. Fill mini muffin cups about two-thirds full and reduce the baking time to 10 to 12 minutes. Keep a close eye on them since they bake much faster than regular-sized muffins.
Paper liners make removing the muffins easier and help prevent sticking, which can be more of an issue with gluten-free baked goods. If you prefer not to use liners, grease your muffin tin very thoroughly with oil or cooking spray. The muffins might stick slightly to the pan, but they should still release if you let them cool for a few minutes first.
You can fold in up to ¾ cup of fresh or frozen berries after the hydration period. If using frozen berries, don't thaw them first, as this adds too much moisture to the batter. Keep in mind that adding berries will increase the moisture content, so you might need to bake the muffins for an extra 2 to 3 minutes.
Look for packages that say "certified gluten-free" on the label. Regular oats are often processed in facilities that also handle wheat, which can lead to cross-contamination. Certified gluten-free oats have been tested to contain less than 20 parts per million of gluten, making them safe for people with celiac disease or gluten sensitivity.

Living with Hashimoto's means constantly adapting recipes to fit my needs without losing what made them special in the first place. These gluten-free banana oat muffins prove that you can bake beautiful, delicious muffins even when you're working around dietary restrictions. The key is understanding how gluten-free ingredients behave differently and giving your batter the time it needs to come together properly.
Whether you're tackling quick breads like these muffins or venturing into yeasted gluten-free bread, understanding how your ingredients work together makes all the difference.
I hope this recipe helps anyone else navigating gluten-free baking feel a little less intimidated. There's definitely a learning curve, but once you understand the science behind it, these techniques become second nature.
If you make these gluten-free banana oat muffins, I'd love to hear how they turn out for you and whether you tried any of the variations. Your feedback helps other readers and means the world to me.
0 comments