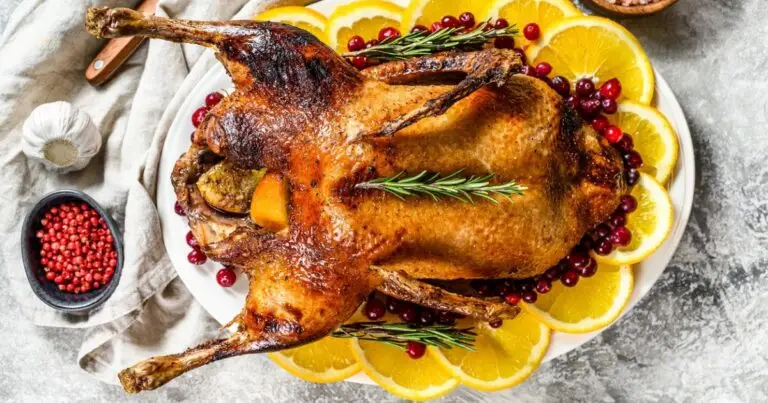
This roast duck with orange stuffing delivers crispy golden skin and citrus-scented bread dressing in just over two hours of hands-off oven time. The 1959 technique skips the fussy trussing and relies on slow roasting at 325°F to render the fat naturally while keeping the meat tender.
Orange stuffing brings brightness to rich duck meat without the cloying sweetness of modern glazes. Toasted bread cubes soak up duck drippings as they roast, creating a savory dressing that tastes like the best parts of Thanksgiving minus the turkey dryness.
The 1959 Kitchen
While this duckling roasted in 1959 ovens, families might have been watching Bonanza on their new color televisions or listening to Bobby Darin croon "Mack the Knife" on the radio. The postwar economy meant more Americans could afford special occasion meats like duck, which butchers sold fresh at neighborhood markets rather than shrink-wrapped in supermarket freezers.
Home cooks relied on Pyrex roasting pans and manual meat thermometers, checking doneness by wiggling the leg joint rather than reading digital displays. Duck represented celebration dining before restaurant culture took over holiday meals, when hosting at home meant showing off your best recipes and your mother's good china.
This recipe appeared during the golden age of convenience cooking, when canned ingredients and streamlined techniques promised to free housewives from kitchen drudgery. Yet the method stays remarkably simple compared to today's multi-step duck preparations involving air-drying, scoring patterns, and repeated basting. One duck, one stuffing, one pan, and patience.
What Makes This Duckling with Orange Stuffing Outstanding
Roast Duck with Orange Stuffing Recipe
This vintage roast duck recipe delivers crispy golden skin and citrus-scented orange stuffing through a simple slow-roasting technique. No complicated scoring or constant basting required, just pure 1950s holiday elegance that lets the duck’s rich flavor shine. The bread stuffing absorbs savory drippings while fresh orange and celery keep everything balanced and bright.
- Total Time: 2 hours 20 minutes
- Yield: 4 servings 1x
Ingredients
- 1 whole duckling (3 1/2 to 5 pounds ready-to-cook weight, or 5 to 7 pounds dressed weight)
- Salt for rubbing inside cavity
- 3 cups toasted bread cubes
- 2 cups finely diced celery
- 1 tablespoon grated orange peel
- 2/3 cup diced orange sections (about 1 large orange)
- 3/4 teaspoon salt
- 1/2 teaspoon poultry seasoning
- Dash of black pepper
- 1 beaten egg
- 1/4 cup melted butter or margarine
- 2 tablespoons honey
- 1 teaspoon Kitchen Bouquet browning sauce
Instructions
- Prepare the duck: Select a duckling weighing 3½ to 5 pounds ready-to-cook weight. Clean the duckling thoroughly and remove wing joints and tips, leaving only the meaty second joints. Pat completely dry inside and out with paper towels.
- Season: Rub the inside cavity with salt.
- Make the stuffing: In a large bowl, toss together toasted bread cubes, diced celery, grated orange peel, diced orange sections, salt, poultry seasoning, and pepper. In a small bowl, combine beaten egg and melted butter. Add to the bread mixture and toss lightly until evenly moistened.
- Stuff the duck: Stuff the duck cavity loosely with the orange stuffing. Do not pack tightly. Close the opening with skewers and lace with kitchen cord.
- Position for roasting: Place the duck breast side up on a rack in a shallow roasting pan. Do not add water to the pan.
- Roast: Roast uncovered in a slow oven at 325°F for 1½ to 2 hours for moderately done duck, or 2 to 2½ hours for well-done duck. The meaty part of the leg should feel tender when pressed through a paper towel, and it should be easy to move the leg up and down.
- Apply glaze: For a glossy finish, combine 2 tablespoons honey and 1 teaspoon Kitchen Bouquet in a small bowl. About 30 minutes before the duck is done, brush the honey glaze over the skin.
- Rest and serve: Remove from oven and let rest for 15 minutes before carving. Serve hot with the orange stuffing.
Notes
- Kitchen Bouquet is a browning and seasoning sauce available in the condiment aisle. Substitute with gravy master or a mixture of soy sauce and molasses (½ teaspoon each) if needed.
- Fresh orange sections work better than canned mandarin oranges, which turn mushy during the long roasting time.
Nutrition
- Serving Size: 12 ounces
- Calories: 645
- Sugar: 8g
- Sodium: 785mg
- Fat: 42g
- Saturated Fat: 16g
- Carbohydrates: 22g
- Fiber: 2g
- Protein: 45g
- Cholesterol: 235mg
How to Roast Perfect Duck with Orange Stuffing
Recipe Variations, Serving Ideas, And Storage
Recipe Variations
Frequently Asked Questions
Slow roasting at 325°F renders the fat more effectively than high-heat methods. Starting at 425°F or 450°F causes the fat to liquify so quickly that it creates steam, which actually prevents crisping. The low temperature gives the skin time to render fat gradually while drying out and turning crisp. If you want extra-crispy skin, increase the temperature to 400°F for the final 15 minutes after applying the glaze.
This 1959 recipe doesn't require pricking or scoring, and I've found it unnecessary at the 325°F temperature. Scoring helps at higher temperatures to release fat faster, but creates more splattering and mess. The slow roasting naturally renders the fat without intervention. The only exception is if you want a decorative crosshatch pattern, which is purely aesthetic.
Substitute Kitchen Bouquet with Gravy Master, or make your own by mixing ½ teaspoon soy sauce with ½ teaspoon molasses. The main purpose is adding color and a subtle umami depth to the sweet honey. You can also skip it entirely and use just honey, though the glaze will be lighter in color and slightly less complex in flavor.
Boneless duck breasts work but require a completely different cooking method since they're much thinner than a whole bird. Score the skin and sear breast-side down in a cold pan, then finish in a 400°F oven for 6-8 minutes for medium-rare. Prepare the orange stuffing as a side dish rather than stuffing it into the breasts.
The original recipe's paper towel test works perfectly. Press the meaty part of the thigh through a folded paper towel. It should feel tender, not firm or rubbery. Wiggle the leg up and down. It should move freely at the joint rather than resisting. These tactile tests tell you more about duck doneness than temperature alone since duck legs benefit from slightly longer cooking than the breast.
Strain the fat through a fine-mesh sieve into a glass jar and refrigerate for up to a month. Duck fat makes extraordinary roasted potatoes, fried eggs, and sautéed vegetables. You can also use it to make duck confit or as a base for gravies. Some cooks swear by it for pie crusts and biscuits, though that's admittedly an acquired taste.
Never stuff poultry in advance due to food safety concerns. The warm cavity creates ideal conditions for bacterial growth. Prepare the stuffing mixture and refrigerate it separately, then stuff the duck right before roasting. This takes only a few extra minutes and eliminates any health risks.
Duck is naturally high in fat, which is part of what makes it delicious. Roasting on a rack allows most of the fat to render away from the meat, significantly reducing the final fat content compared to other cooking methods. Removing the skin before eating cuts fat and calories substantially. For a leaner option, choose duck breast over whole duck and trim visible fat deposits before cooking.
One 5-pound duck serves 3 to 4 people. Duck has less meat than chicken of comparable weight due to its larger bone structure and fat content. Plan on about 1 to 1.25 pounds of whole duck per person. For larger gatherings, roast two ducks rather than trying to find an oversized bird.
Absolutely. Double or triple the recipe depending on your turkey size. The orange and celery combination works beautifully with turkey, and the method is identical. You'll need about ¾ cup of stuffing per pound of turkey. Any extra stuffing can be baked separately in a covered dish at 350°F for 30-40 minutes.

For a holiday feast, this roast duck is the undisputed star, but if you're looking for that same 'wow' factor on a busy weeknight, this Oven Planked Chicken Recipe from 1919 offers a similarly elegant presentation in under an hour. It’s a fantastic way to keep those traditional poultry techniques in your rotation without the long roasting time of a whole duck.
Did your family serve duck for special occasions, or was it always turkey? I'd love to hear about your holiday table traditions and any vintage recipes you're keeping alive.
If you make this 1959 roast duck with orange stuffing, please leave a rating and review! Your feedback helps other readers decide if this recipe is right for their holiday table.
0 comments